This is a short narrative and images that I submitted as part of an application to the Mass Cultural Council for the 2020 funding cycle. I applied under the category of Traditional Arts and have been honored with a Fellowship as a finalist. I am honored and grateful to have the recognition and support.
The images were gleaned from recent work, and arranged in a way that I hope shows some of the considerations and requirements in my field as well as the specific outcomes I have been able to achieve in my shop.
While writing the narrative, I assumed that my audience would know little if anything specifically about violin restoration, but would appreciate and possibly share in some way, a sense of youthful discovery followed by a dogged pursuit of excellence in a somewhat esoteric art. I was limited in word count and so, to make a long story short…
Violin restoration is an art distinct from, but related to violin making. The violin as we know it was perfected in form and function by makers in 17th century Italy, and especially in Cremona by the Amati, Stradivari and Guarneri workshops. By the mid 18th century, particularly in Paris and London, these aging “Golden Period” masterworks from Cremona, having grown in value and regard, inspired a new interest in the possibilities of restoration, and thus an emerging set of problems to be addressed by new skills and techniques. Not only does my work require fine woodworking skills and a chameleon-like ability with varnish, but also skill with imaging tools (microscope, UV light), and casting materials like plasters and resins.
In America, violin restorers and violin makers, have a long history of cross pollinating with our European counterparts. My own background as a restorer is an example. As a young person, I played first cello, and then guitar. The loan of an ancient Italian cello, fondly known as “the Magnificent Wreck”, incited my fascination with the instruments themselves. I had an early and short introduction to making fretted instruments in the form of an apprenticeship right after high school in 1976. Later, when I chose to apply my skills to violin family instruments, and in particular to restoration work, I had to piece together my ongoing education/training.
I combined some on the job training, with annual participation in short courses over many years and in several places. From 1990 to 2003 or so, I attended summer sessions with master restorer Hans-Jürgen Nebel. Master Nebel, from a violin making family in Mittenwald, Germany, had been handpicked by Simone Sacconi (one of the “fathers” of violin restoration) to work at Rembert Wurlitzer’s in NYC. Wurlitzer’s at the time, c.1956, figured among the best restoration shops in the world. Master Nebel became my mentor even after I’d attended all of his classes, hiring me to work on instruments that he owned. Each delivery of a newly completed project was accompanied by a thorough and invaluable critique. We are still in touch.
Throughout the 2000’s I was a regular participant at the restoration course at Oberlin’s Summer Violin Institute. I also attended ten day courses at West Dean, England in ’06, ’07 and ’09. I continue to travel to learn – most recently to the UK and to Taipei. This summer I will be teaching short courses in crack repair and varnish retouching. Over the years, I have created a valuable network of colleagues dedicated to the sharing of techniques and expertise and from whom I am always learning something new.
The instruments I work on belong to professional players, teachers, performers and their students. Sometimes I take a project from a dealer or private collector. Some of my clients come from far away, most come from the Northeast USA. Some of the instruments I work on are extremely valuable. The oldest was a violin made by Antonio and Girolamo Amati in 1618. I am charged with restoring structural health and beauty to instruments that have been damaged, or have deteriorated, sometimes over hundreds of years.
My clients also require that their instruments be maintained and occasionally adjusted for tone and ease of playing. When a musician leaves my workshop with a healthy and happy instrument, I like to think that in my way, I’ve had a hand in making great music.
On a final note: there is always an unspoken presence in room – the maker of the instrument I happen to be working on. As a restorer, I have an additional responsibility to preserve and honor the integrity and the history of the original work of art. This is yet another layer to the art of violin restoration.
Making and Using a Plaster Cast

The restoration of this violin by maker Jacob Stainer 1673, involved making plaster casts for both the top and the back. Casts serve several purposes. As a counterpart, they provide perfect support while fragile parts are being worked on. The casts themselves can also be reshaped when an instrument has suffered serious distortion from age and the inevitable stress of string tension. For instance, if the top of a violin has sunken over time, a cast is made and then corrected to recreate the original arch. Then the wooden top is pressed into the corrected cast with a warm sandbag, a bit of moisture and light clamping pressure. In this montage, a cast of the back of the back of the violin is made and then used for several repairs, including the crack repair shown in the lower left. All measures are taken, of course, to protect the instrument from anything that might damage it during the process. Third image down on the right shows a latex barrier that isolates the instrument from the plaster as it is poured. Photos: Stacey Styles
Purfling and Edgework
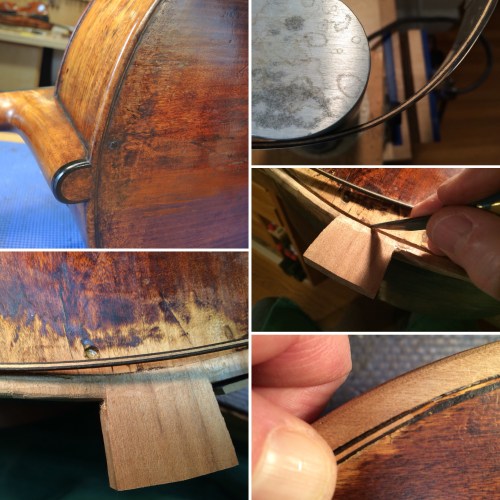
Here is an early 18th century cello by the Testore family in Milan. It had suffered both years of deterioration and a recent serious injury. One area of the work included rebuilding the upper back edge and the button (the tab that joins the upper back with the neck). This project involved some sleuthing, a bit of research and collegial consultation to come up with an appropriate match of materials. Black willow finally was the closest match for the back, which is more normally made from maple. In these photos, the new repair wood is not yet colored or varnished. The original wood retains the original varnish. The purfling is the black/white/black strip that accentuates the outline and provides some bit structural reinforcement. Parts of the purfling were missing, or were badly matching replacements. I custom made a new piece with a close match in size and materials. On the upper right, the new purlfing is bent on a hot bending iron, a channel is cut in the new wood and the purfling is installed. The match is pretty good. The finished job is in the upper left corner. Hopefully, it’s not evident that I was ever there. Photos: Stacey Styles
Rib Restoration
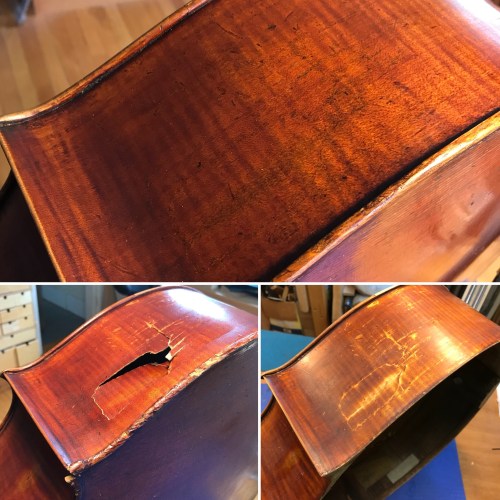
This lovely old 19th century English cello took a hit when its owner got it caught between a music stand and a heavy church door. The accident is now part of the instrument’s history, and although an effective and tasteful repair can be made, it will never be completely invisible. This was a challenge to piece together without further damaging the wood fibers. I made a wooden counterpart to support the shape of the rib while I worked on it. The top photo is the finished repair. The bottom left shows the cello when it arrived in my shop. The bottom right shows the rib before the final step of touching in new color and varnish to blend with the original. Photos: Stacey Styles
Varnish Retouching
This short video shows a bit of retouching happening on the top of a violin. The violin, 18th century from Central Italy, came to me for extensive restoration including crack repair, arching correction, button grafting, and varnish restoration. Varnish retouching is always part of repair work, but in this case, there was an ugly application of old repair varnish that had to be removed, before touching in new and more aesthetically accurate varnish. One of my favorite challenges is retouching varnish. Success requires a good eye, steady hand and careful consideration and creative use of a broad range of materials. Video: Stacey Styles
