Feeds:
Posts
Comments

Posts Tagged ‘musical instruments’

Hah! Discovered this little collection of violin, viola and cello mutes while I was cleaning out some drawers:

DSCN0524

Rosewood, boxwood, ebony, metal, plastic. Waverly, Ton-Wolf, Geschützt, Made in Germany. Some are weighted. One has an A pitch pipe. Arranged on a nice piece of Bosnian maple, hand carried from Ciresa, in the Dolomites. Maybe I’ll make a fiddle out of it someday.

Read Full Post »

This post could easily be a sidebar to two previous posts. It describes a variation on a button doubling, in this case including an ebony crown and a tricky bit of edge replacement. More importantly, in my mind, as another example of a Disappearing Act, it expresses again the “Restorer’s Mind”.

This fiddle came into my shop after a memorable night of live bluegrass, performed on the stage that apparently ate that little piece of maple, which, in its absence, has inspired this post. “Is it possible that it’s in the case?” I asked my client. Sometimes I get lucky, but not this time. Maybe it was inadvertently kicked off the stage and since swept up by the janitor. Perhaps it landed in the dust accumulating in the open back of the bassist’s amp. Maybe it secreted itself in the upturned cuff of the bassist’s jeans (always blame the bassist if you can, if there is no horn section). In the slim chance that there is a baritone sax around, the likelihood is that the missing piece will end up in the bell. Not likely in a bluegrass set. In any case our little bit was gone, gone, gone.

Being a restorer, I am always thinking about what I might otherwise be throwing away, and if there is any chance it might be useful. Rather than searching through my stores of repair wood, I found the perfect match right under my nose. There is a certain amount of wood that has to be taken away in the course of repairing the back button. With some careful planning and a fine toothed saw, I was able to “harvest” a chip that could be reoriented and fit to fill the gap left by the wayward chip now seeking its fortune in Nashville. Here is a series of thumbnails, any of which can be enlarged. Hopefully, you will get the sense of the procedure.DSCN0311DSCN0320DSCN0324


DSCN0329

DSCN0331DSCN0334DSCN0336DSCN0371DSCN0372DSCN0391


In my shop, this is a typical approach to assuring a match when some bit of original material is missing. The first thing I think about is what is about to land on the floor. There’s likely to be some good stuff there.

Read Full Post »

Years ago, I opened an instrument for repair. I was not the first to do so. I was not even the second. My most recent predecessor had not only signed his name, but also left a numbered legend with corresponding arrows clearly identifying his contribution amongst the multiple repairs in the old fiddle. To seal the deal, he used a blue ball point pen, further distinguishing himself from the mere mortals who had signed previously with a lowly pencil. I’m sorry this was before my obsessive picture taking days.

Sometimes, when I open an instrument and see a repairer’s signature/label, I hear myself thinking: Ah, Kilroy was here. Kilroy? Who the heck is Kilroy?  This was an amusing lunchtime digression. Here is a little bit of Americana from urbandictionary.com:

 
In December 1946 the New York Times credited James J. Kilroy, a welding inspector at the Bethlehem Steel shipyard in Quincy, Massachusetts, with starting the craze. Usually, inspectors used a small chalk mark, but welders were erasing those to get double-paid for their work. To prevent this, Mr Kilroy marked his welding work with the long crayoned phrase (“Kilroy was here”) on the items he inspected. The graffito became a common sight around the shipyard and was imitated by workers when they were drafted and sent around the world. As the war progressed, people began opening void spaces on ships for repair, and the mysterious Mr Kilroy’s name would be found there, in sealed compartments “where no one had been before.”
“Kilroy was here…”

So today I decided to put the infamous “Heap of Cello Bits”, which I own, back in the drawer, since I just had another substantial cello job come in that I will actually get paid to do. Instead, I decided to pull out a violin of mine, 19th century French something or other, which I think may be a good candidate for a restoration workshop I may attend this summer. My thinking is that if I can get the cracks repaired ahead of time, I can spend my week away grafting the neck and doing some retouch. I find both of these activities good “travel tasks” because they require a relatively finite set of tools and materials. Retouch is a never ending area of exploration and will always inspire good exchanges with colleagues. And if I can get a graft done too, then I return home with a project solidly moved along.

It’s always a minor thrill to open an instrument. Tonight it was the French fiddle and while there were no serious surprises, good or bad, it was definitely one of those “Kilroy” moments. Kilroy, Kilroy, and Kilroy.DSCN0352DSCN0349

What’s with all the labels? I thought, and then realized that they were all identical except that the handwritten dates spanned 30 years. Our Kilroy in this case is Milton O. Wickes, in case that’s not clear yet.

Currently, the accepted practice among professional restorers is to do the work that needs to be done, be as subtle and/or as eloquent as one can, and leave as little extraneous evidence as possible. My own practice adheres to this principle. Because, in another lifetime I may have been a fantastic spelunker, I conjure images of a pristine, never been explored cavern. Go in, have fun, and pack your crap out.

Still, when I encounter these “indiscretions” in the form of signatures, labels, narratives and veritable road maps, perpetrated by someone other than the original maker, I admit to feeling a little guilty pleasure. Can I puzzle out the whys and wherefores of Mr. Wickes’ three major encounters with this violin? What about that fiddle I had years ago with the simple inscription “do not scrape?” That was a puzzler. Or the Simoutre family history inscribed in a fiddle. Or my favorite, the handwritten apology from a noted Italian maker, for his sloppy repair work: “Repairs according to the price paid.”

Like so many things, I guess it’s a matter of degrees and context. I’m glad Mr. Wickes didn’t plaster his labels all over the inside of a real Joseph Guarnerius, although that would have been the least of it. Labels are removable. Pencil lead is easily washed off. Ballpoint pen, not so much.DSCN0359

Read Full Post »

… or How I “Baroqued” a  Violin That Had Been Previously “Un-Baroqued”.

Try as I might, I could not come up with a catchy phrase that would indicate the opposite of “back to the future”. I love my profession for its fastidious regard for the past, its devotion to the present and its dogged assumption of a future. Because I work with things that are sometimes older than two, three, even four human life spans, I am frequently reminded that the path from here to there is rarely a straight line. In contrast, I think of my beloved Honda Civic which, with 110k miles, is surely headed for the trash heap – a short life lived on a simple trajectory.IMG_0476_3

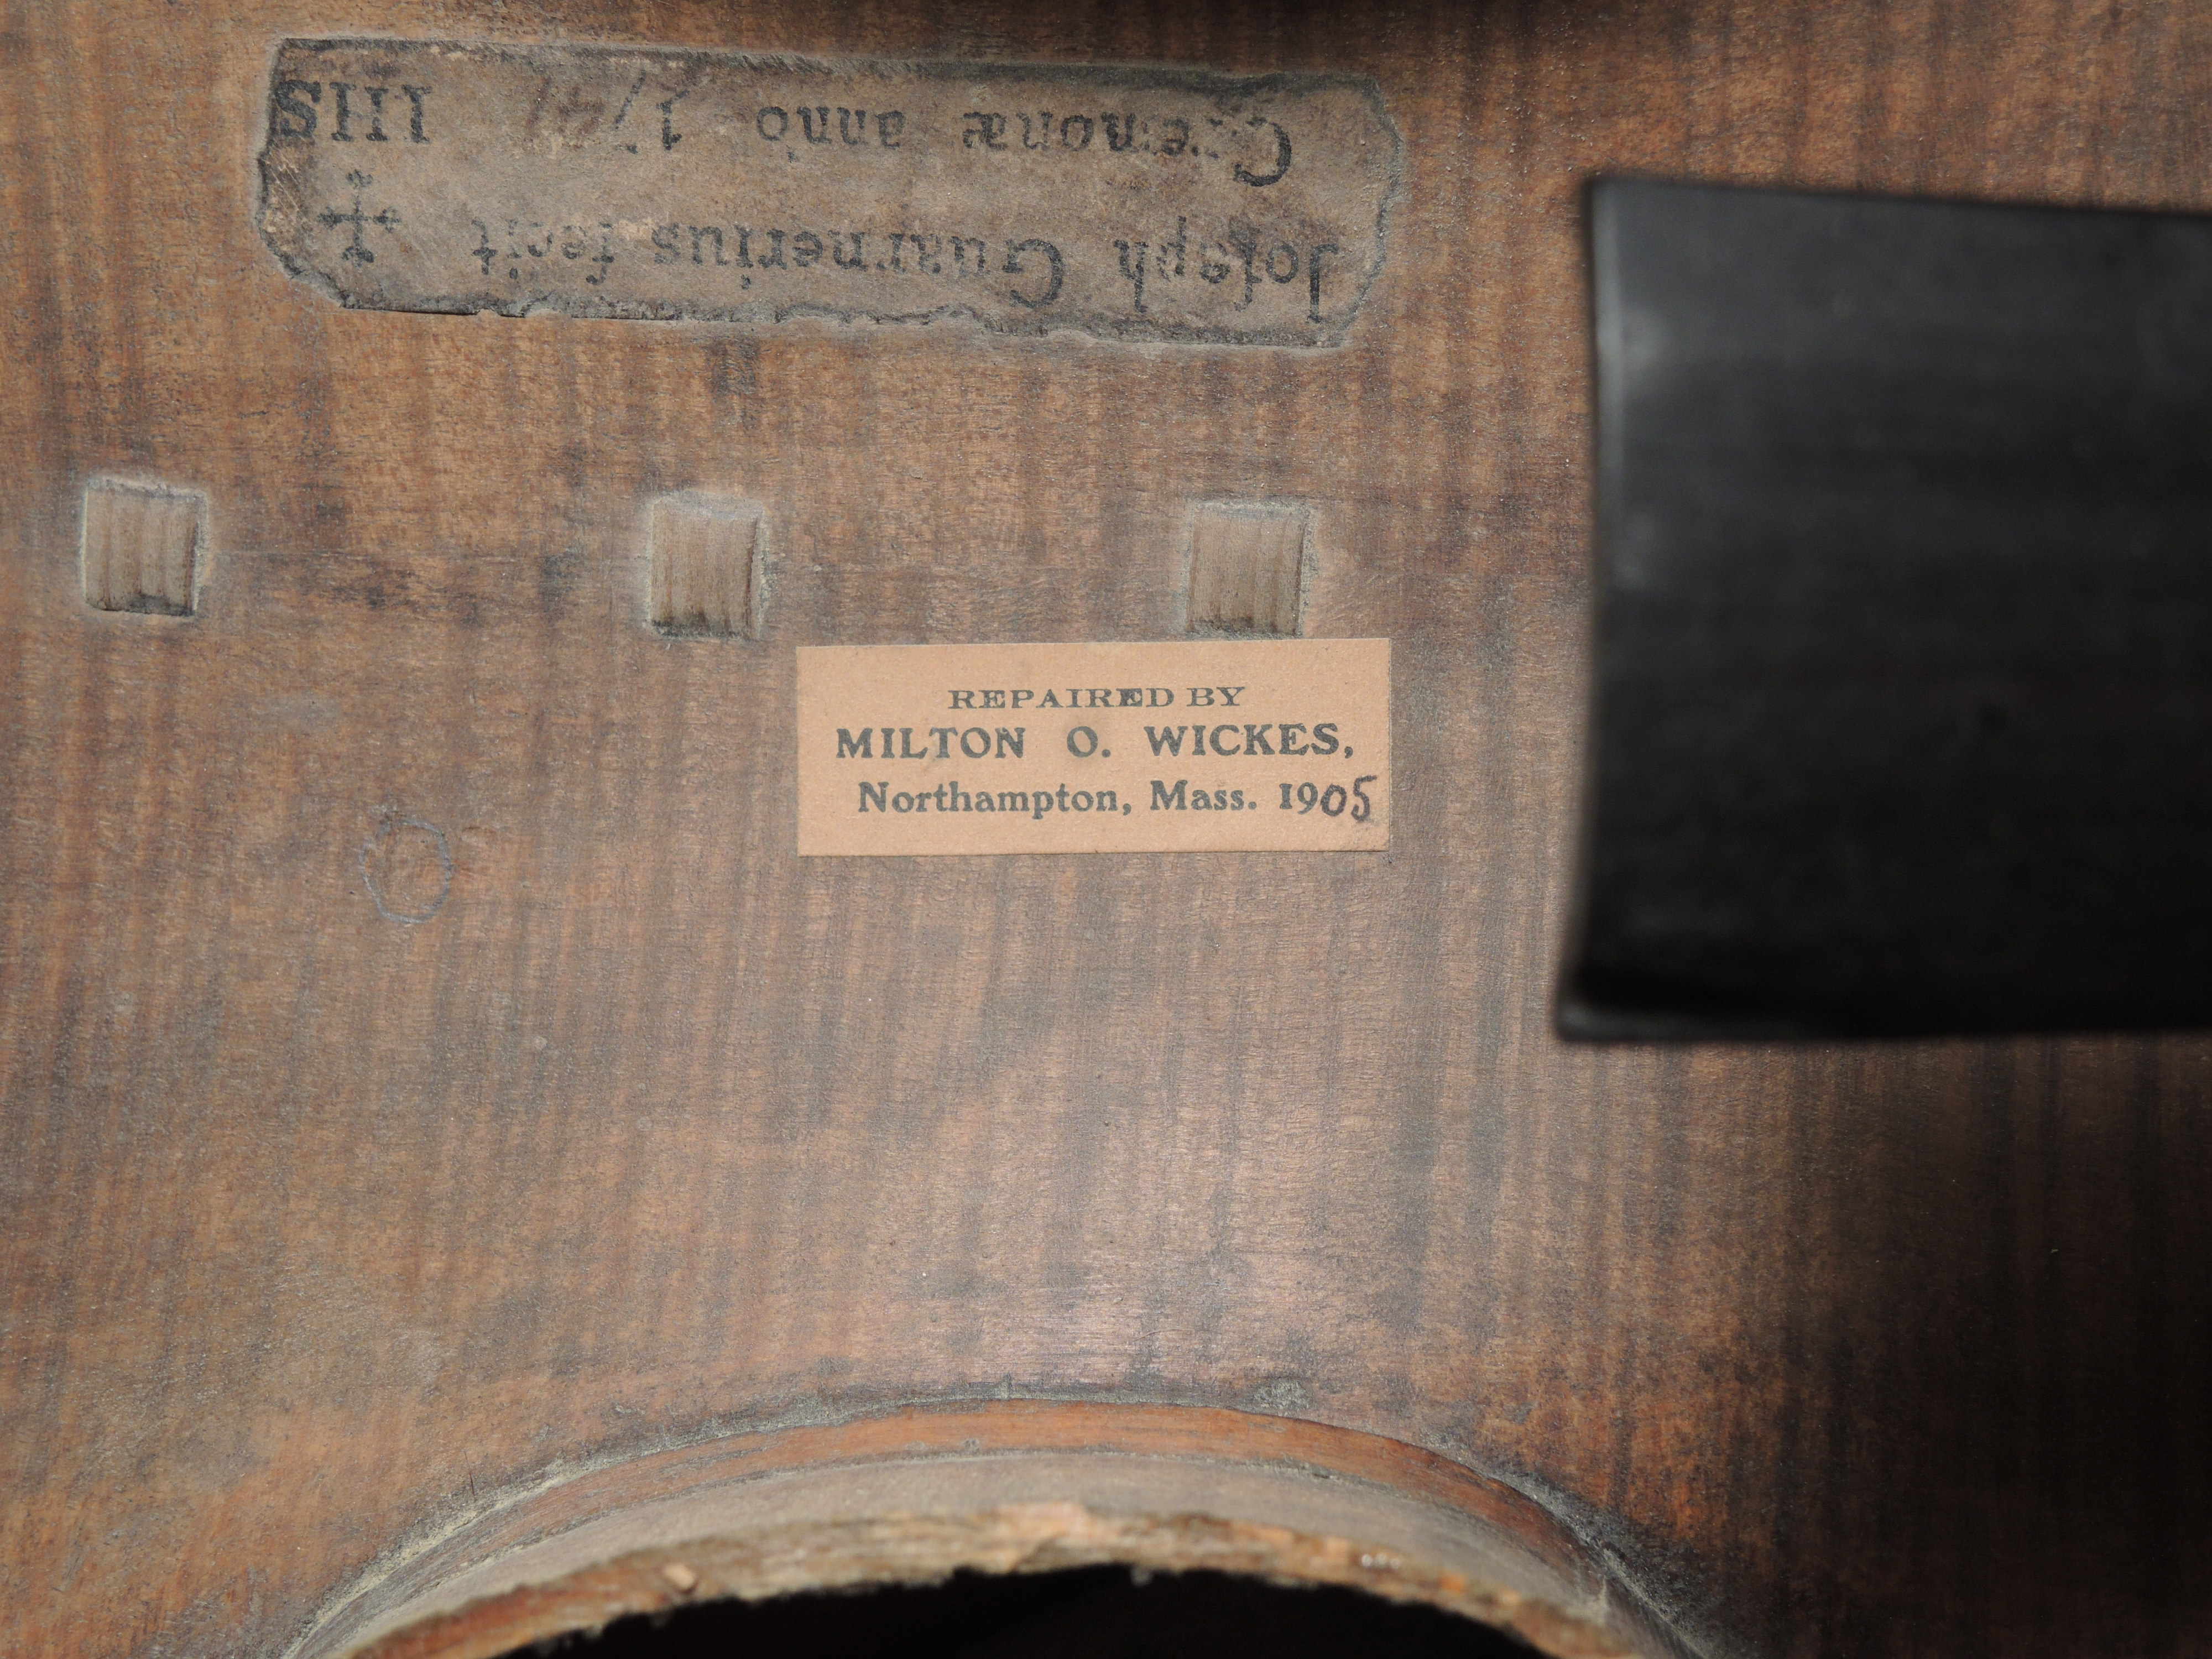
The inspiration for this post is a violin made by an unidentified member of the  Amati family in Cremona, Italy. That would place its construction probably in the late 1600’s. Perhaps this violin was growing and maturing as Antonio Vivaldi assumed his post at the Ospedale Della Pietà in Venice. Certainly by the time J.S.Bach composed the Brandenburg Concertos, it had found its voice. How it ultimately found its way into 21st century America may never be known, but clearly it would have stories to tell.

My mission was to undo some of what had been done along the way. In the 1800’s many old instruments were retrofitted with a neck in the modern style. The earlier “baroque” style neck, was shorter, shaped differently, and had a ramped fingerboard. At some point, this Amati family violin had been “modernized”. The neck and fingerboard had been replaced with the modern version that we are most familiar with today.

Since my client was a teacher and performer of Baroque music, she wished to have her instrument returned to something approximating its original configuration. A note about early violin construction: originally, the neck of an instrument was secured with a nail driven from the inside of the body through the upper block. The top was glued on last. Here is an example, in this case, an ancient violin from Mittenwald, Germany. IMG_4965

In converting an instrument to baroque, one must decide how far to go. In my client’s case, we wished to change the neck without opening the body. Perhaps in the future, if the instrument needs to be opened for additional reasons, we might discuss changing the bass bar too.

Essentially this job required grafting another new neck. But in this case, a standard modern dovetail joint was modified to achieve the look and feel of a nailed baroque style neck. This is the instrument as it came to me, with the standard contemporary configuration of neck and fingerboard:

IMG_0479_2

The first few cuts are always made with the door locked and the phone turned off! The neck is removed from the body, and then the scroll is carefully cut away creating a tapered mortise, to which new neck wood will be fitted.

IMG_0515

Here the scroll is ready to receive the new neck wood.

IMG_0541

The joint fits perfectly and can be glued. Later, the peg box will be carved out and the neck shaped in preparation for setting into the body.

IMG_0534

 With the fingerboard temporarily glued on, the neck is set into the body in the usual manner.

IMG_0551

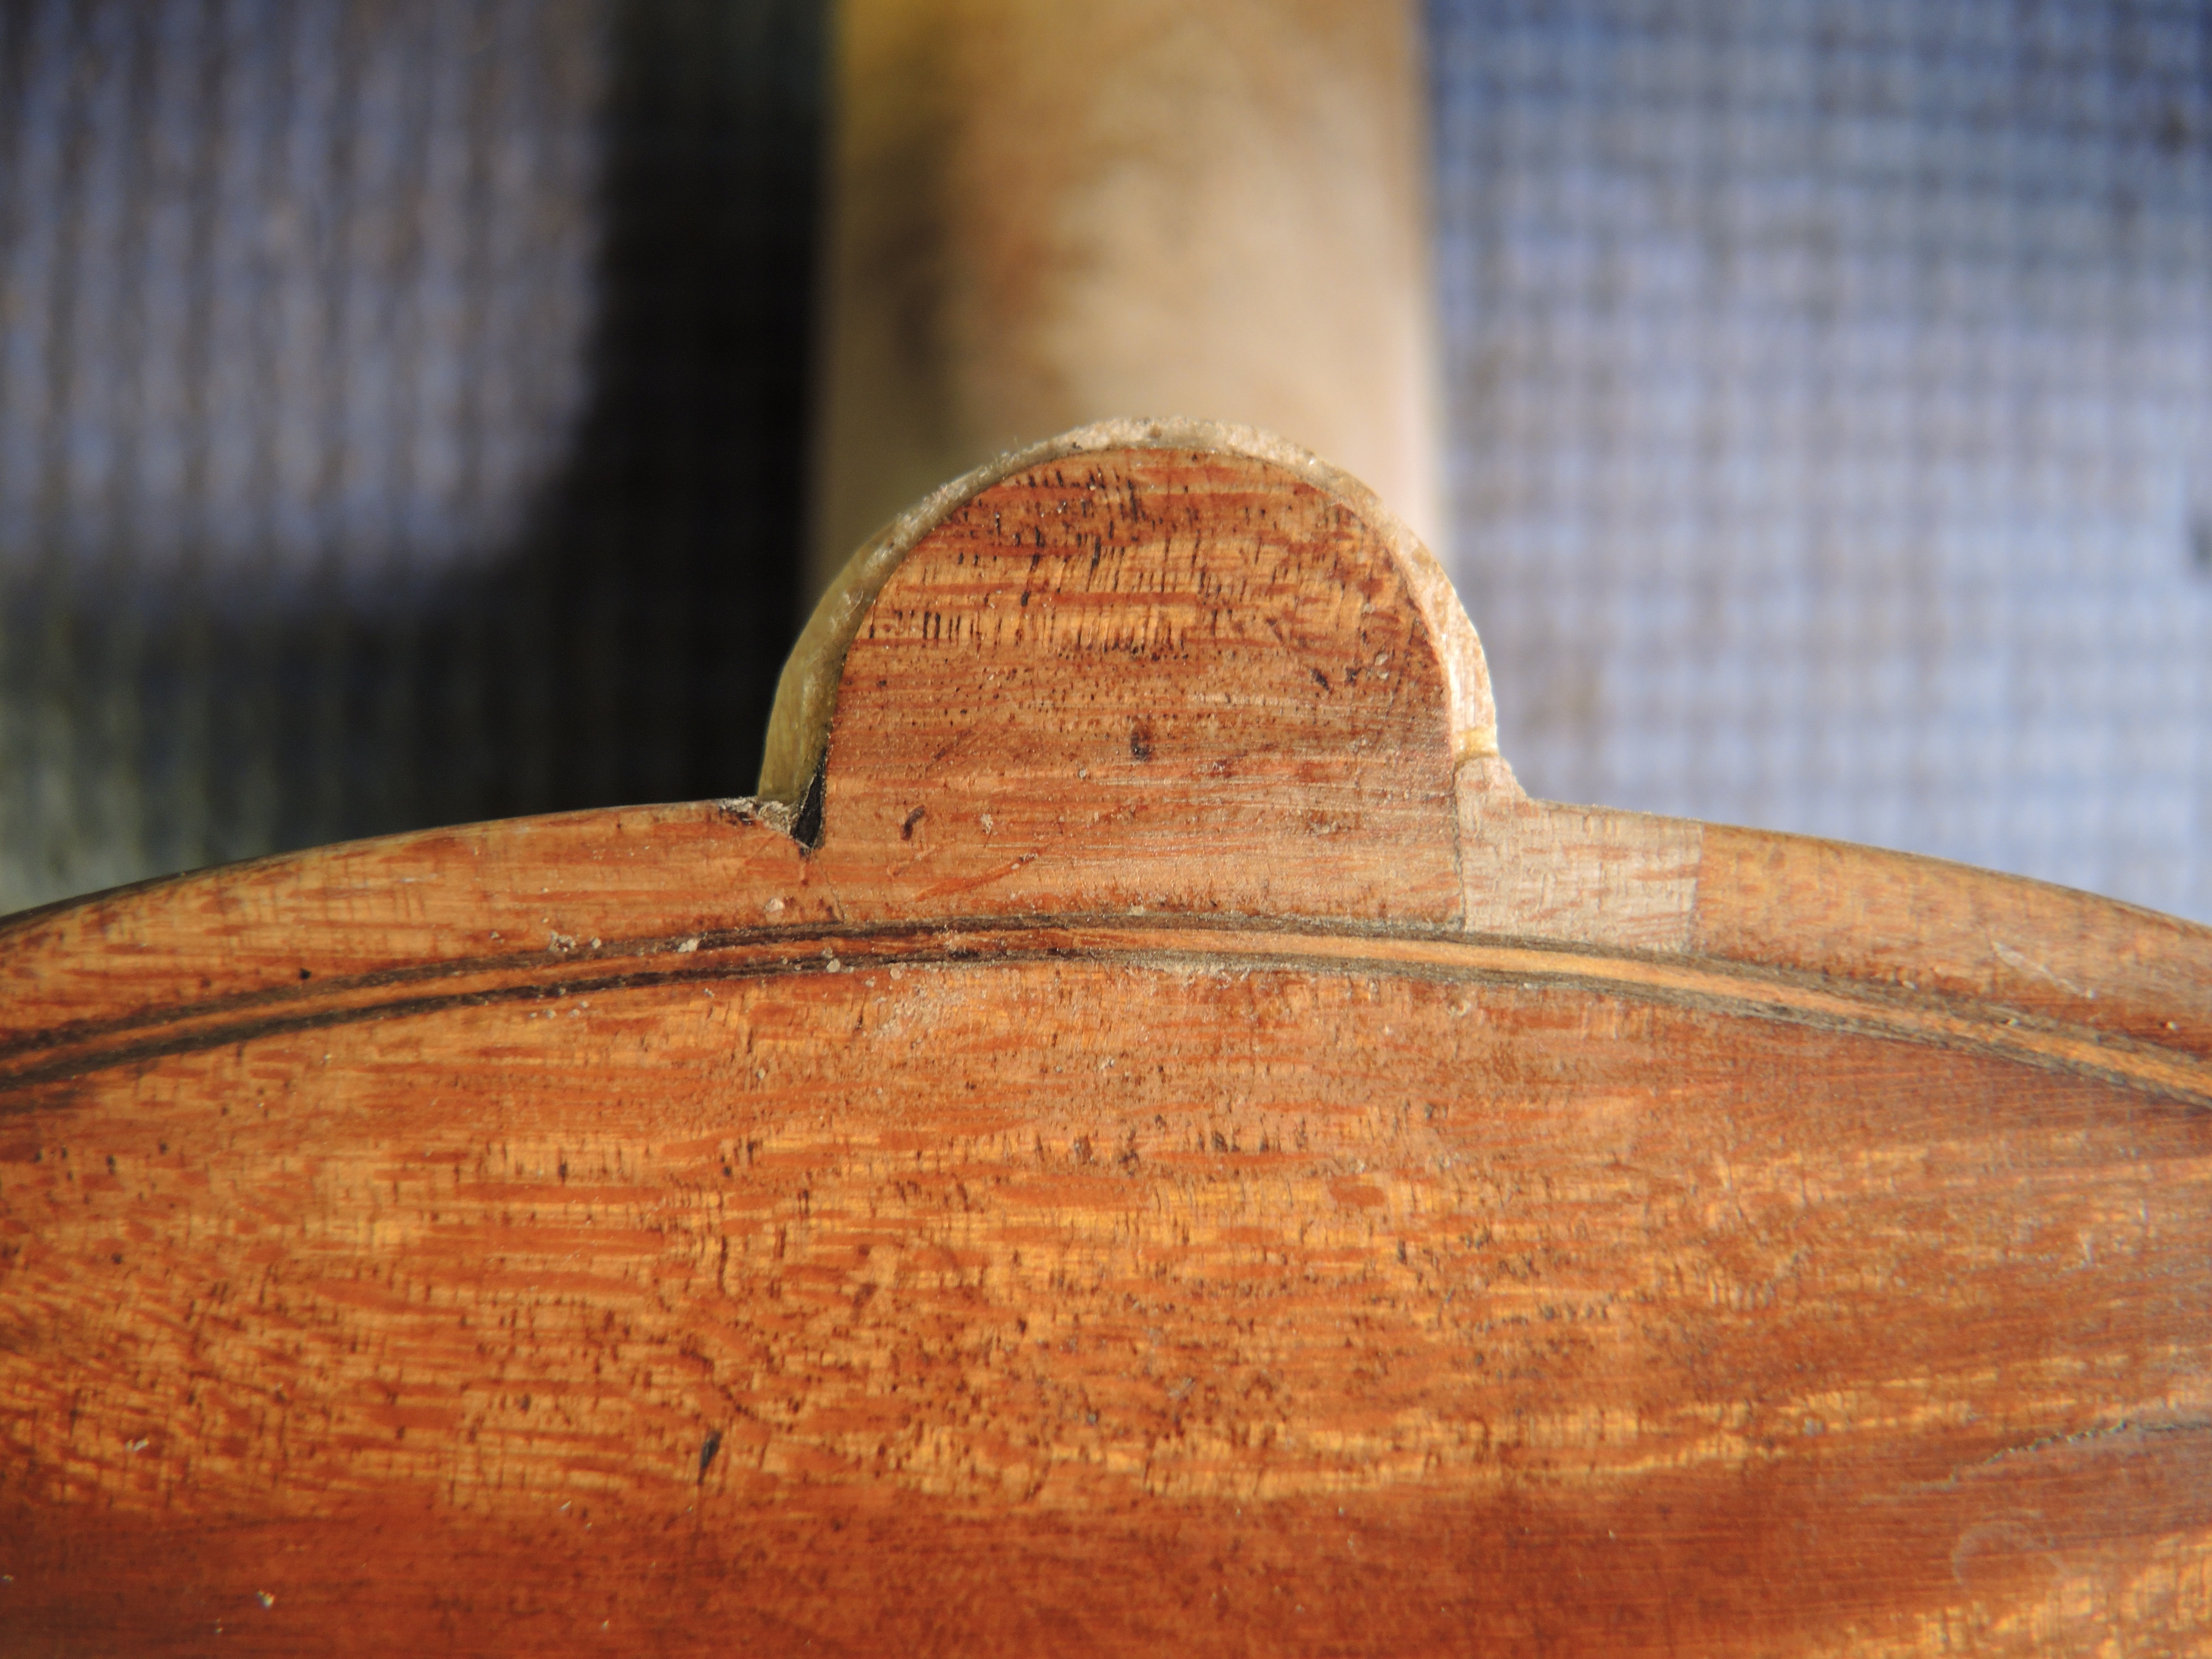
Before gluing, modifications will be made. A cutaway is planned to create a step at exactly the rib height. This will replicate the look and feel of the nailed neck. Also, the underside of the fingerboard will be reshaped in the baroque style.IMG_0555

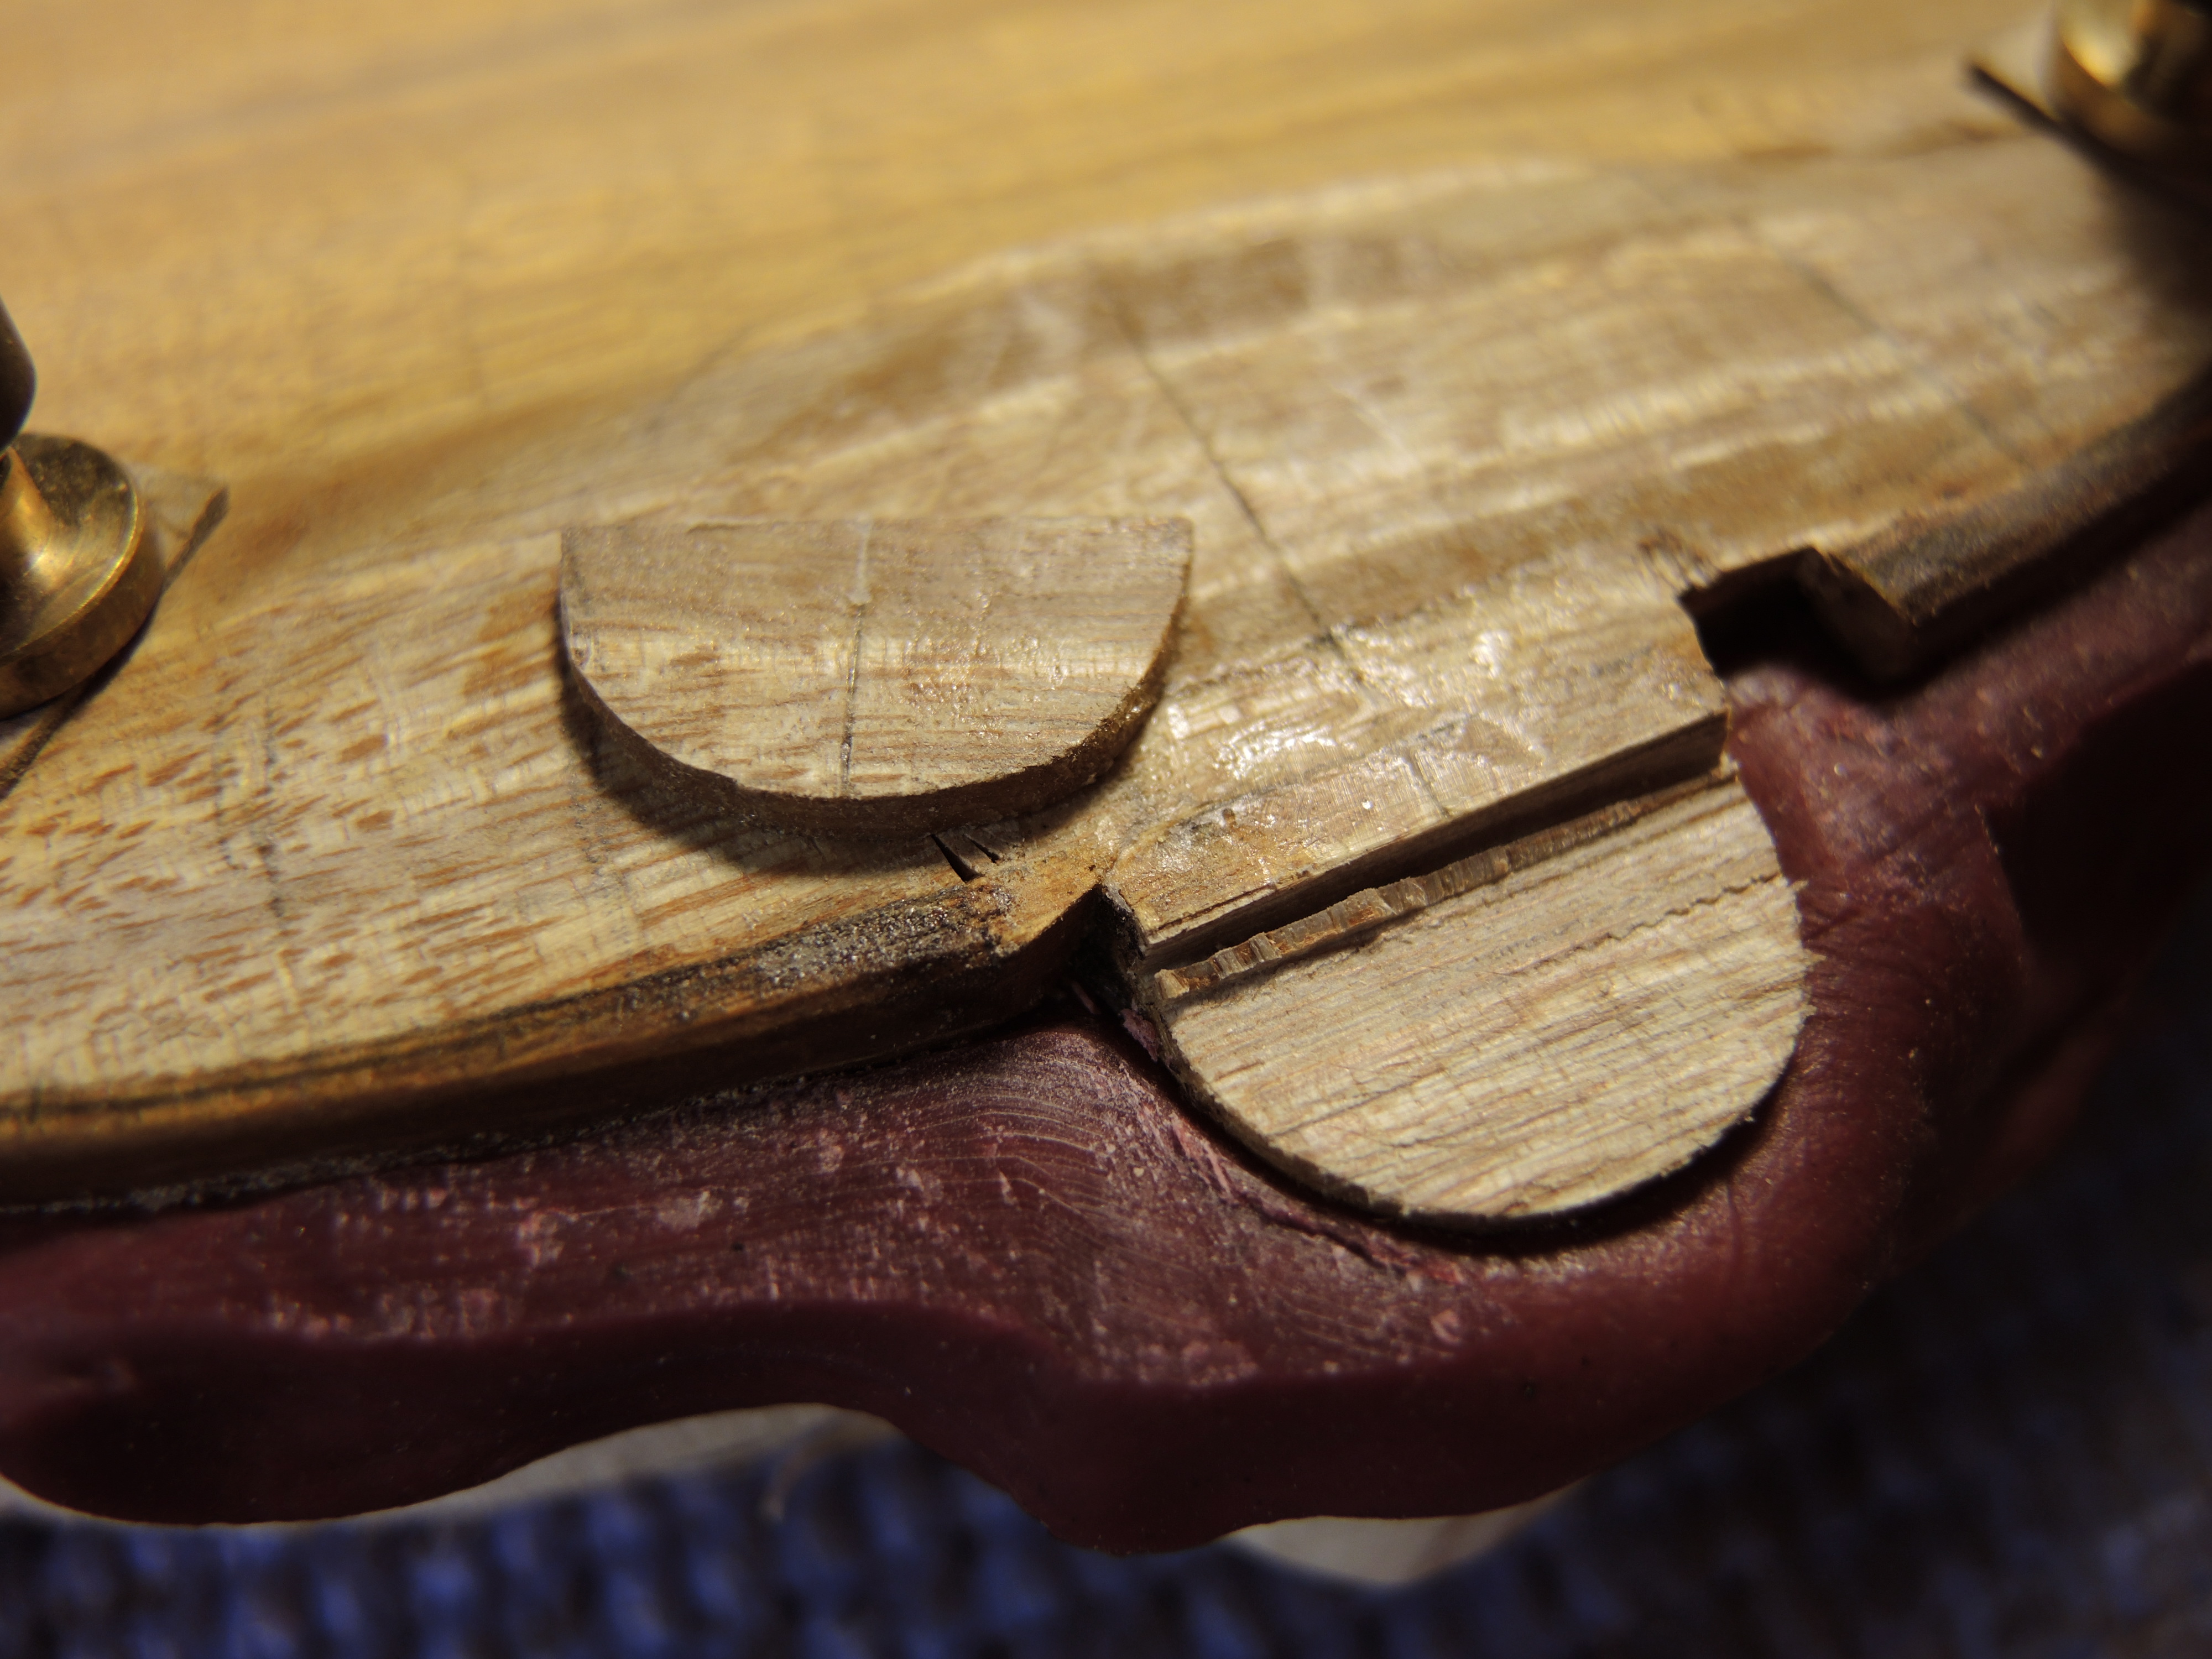
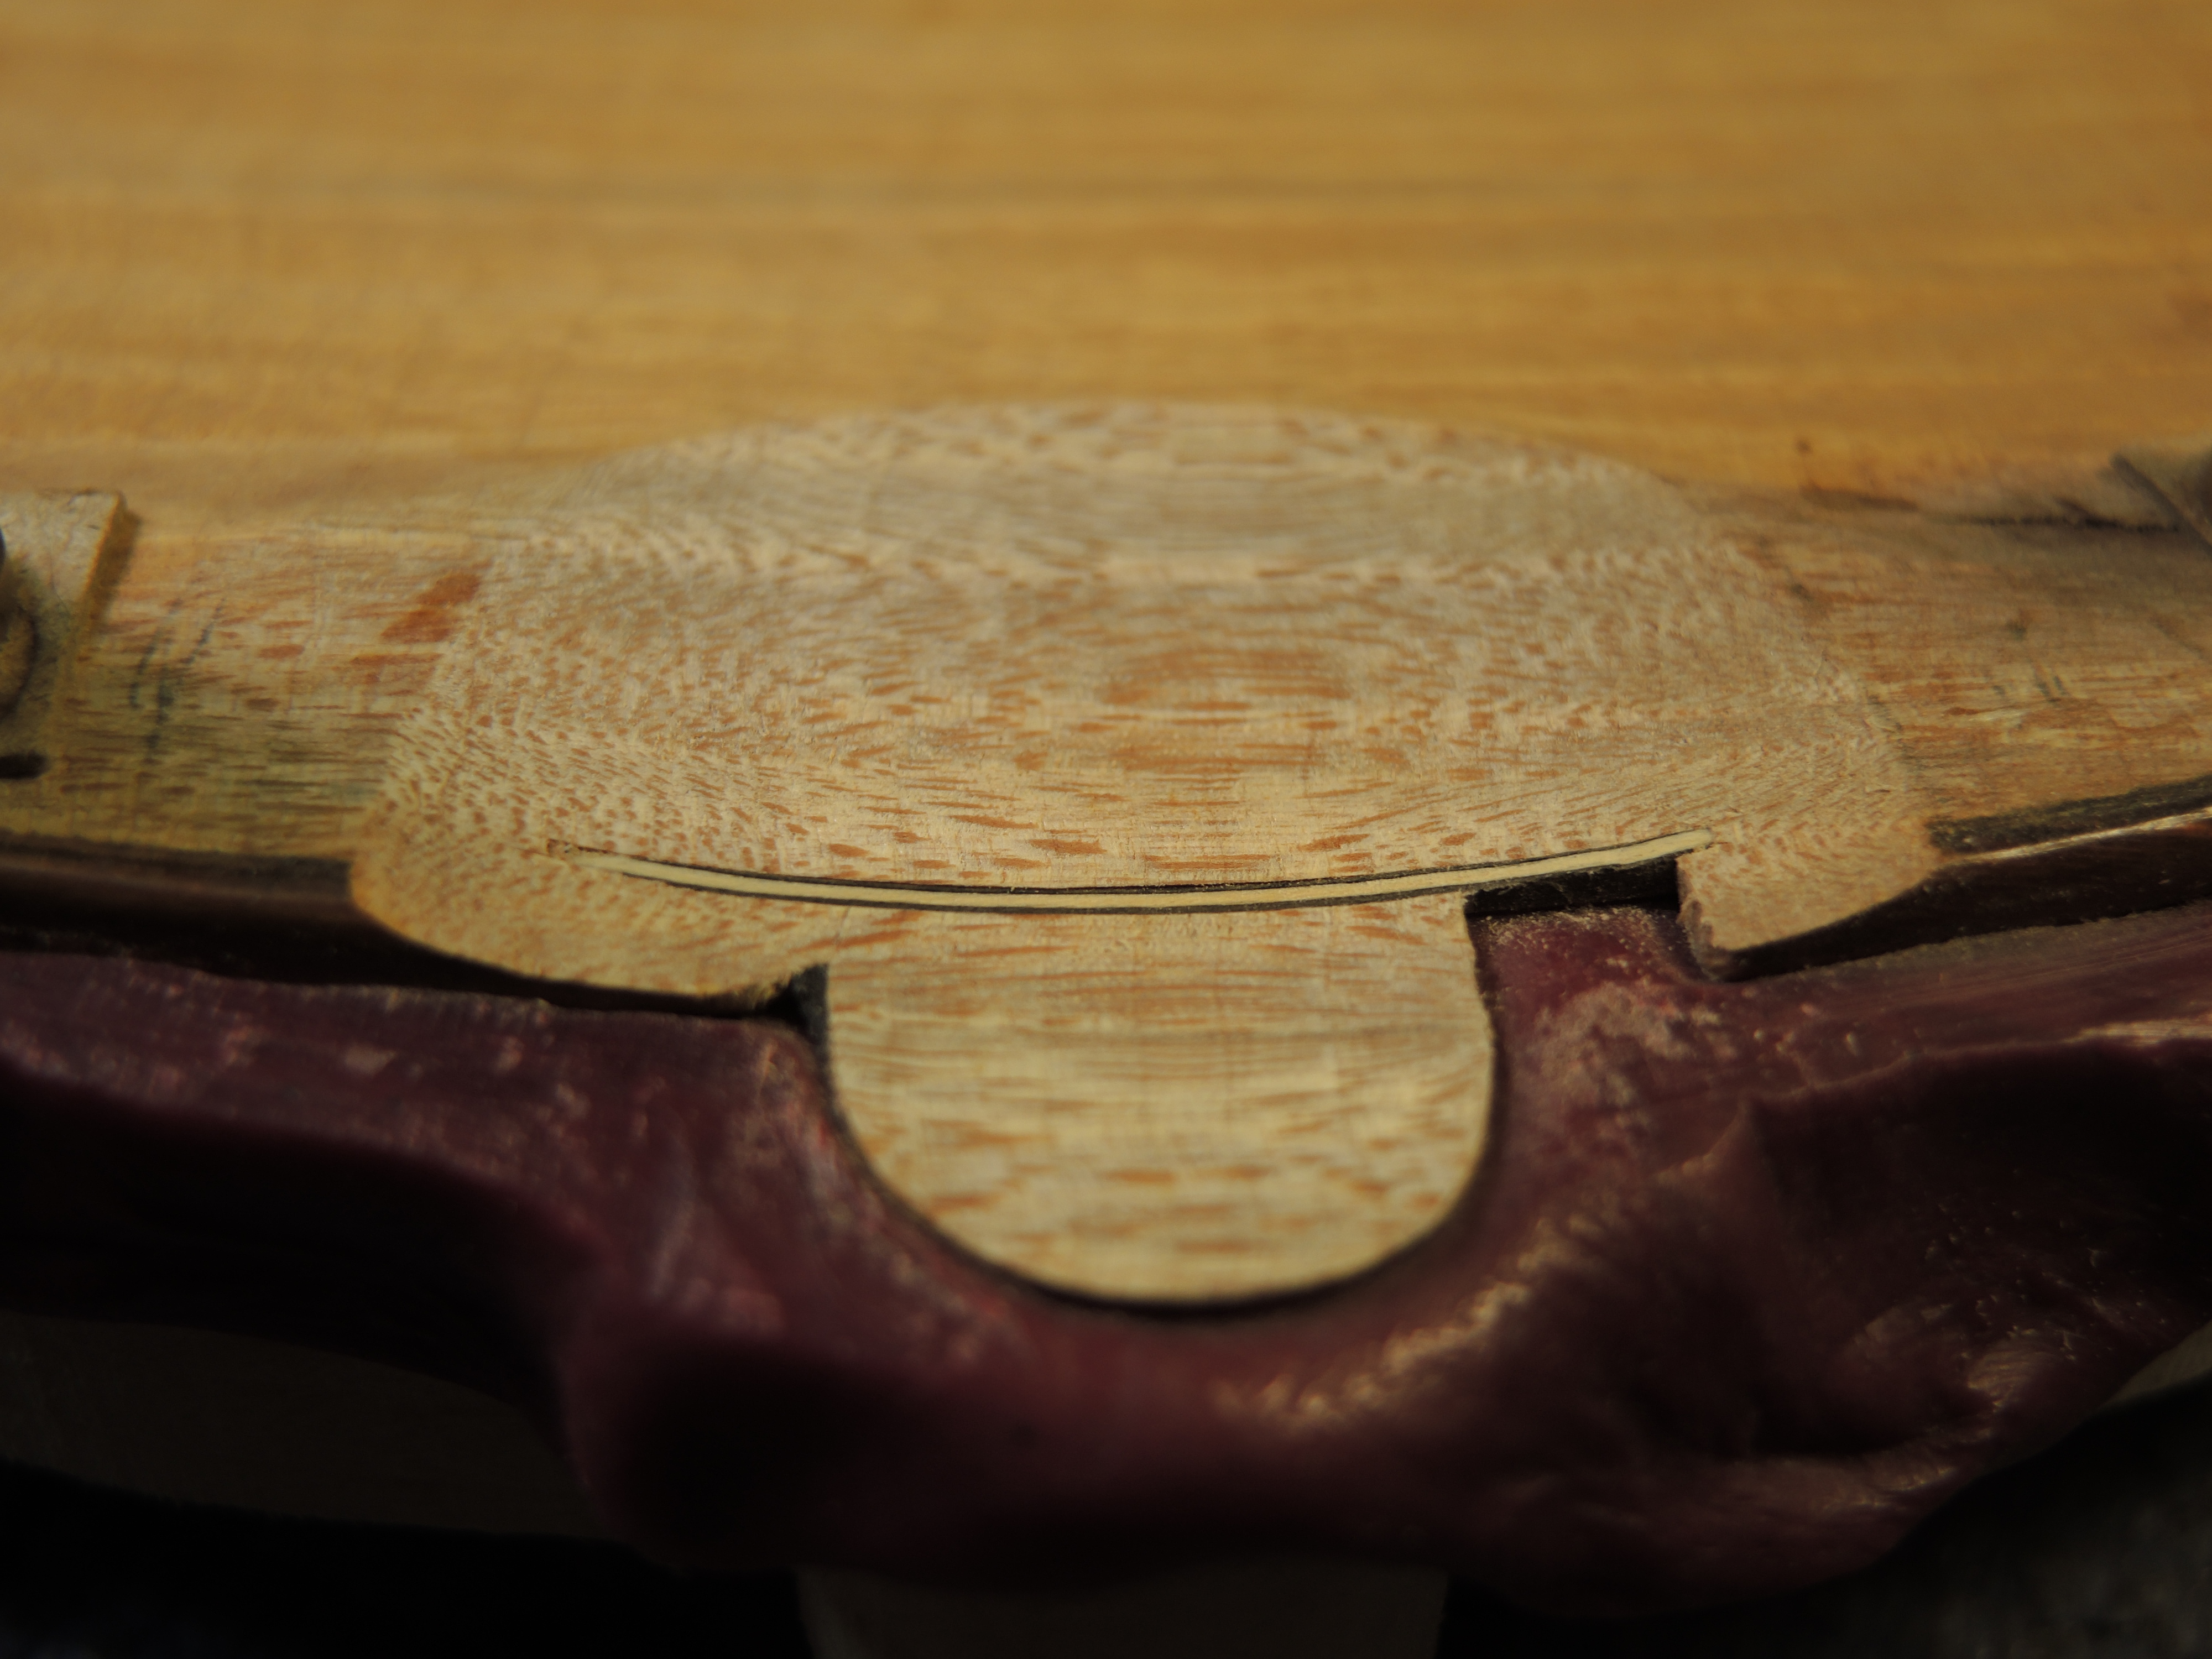
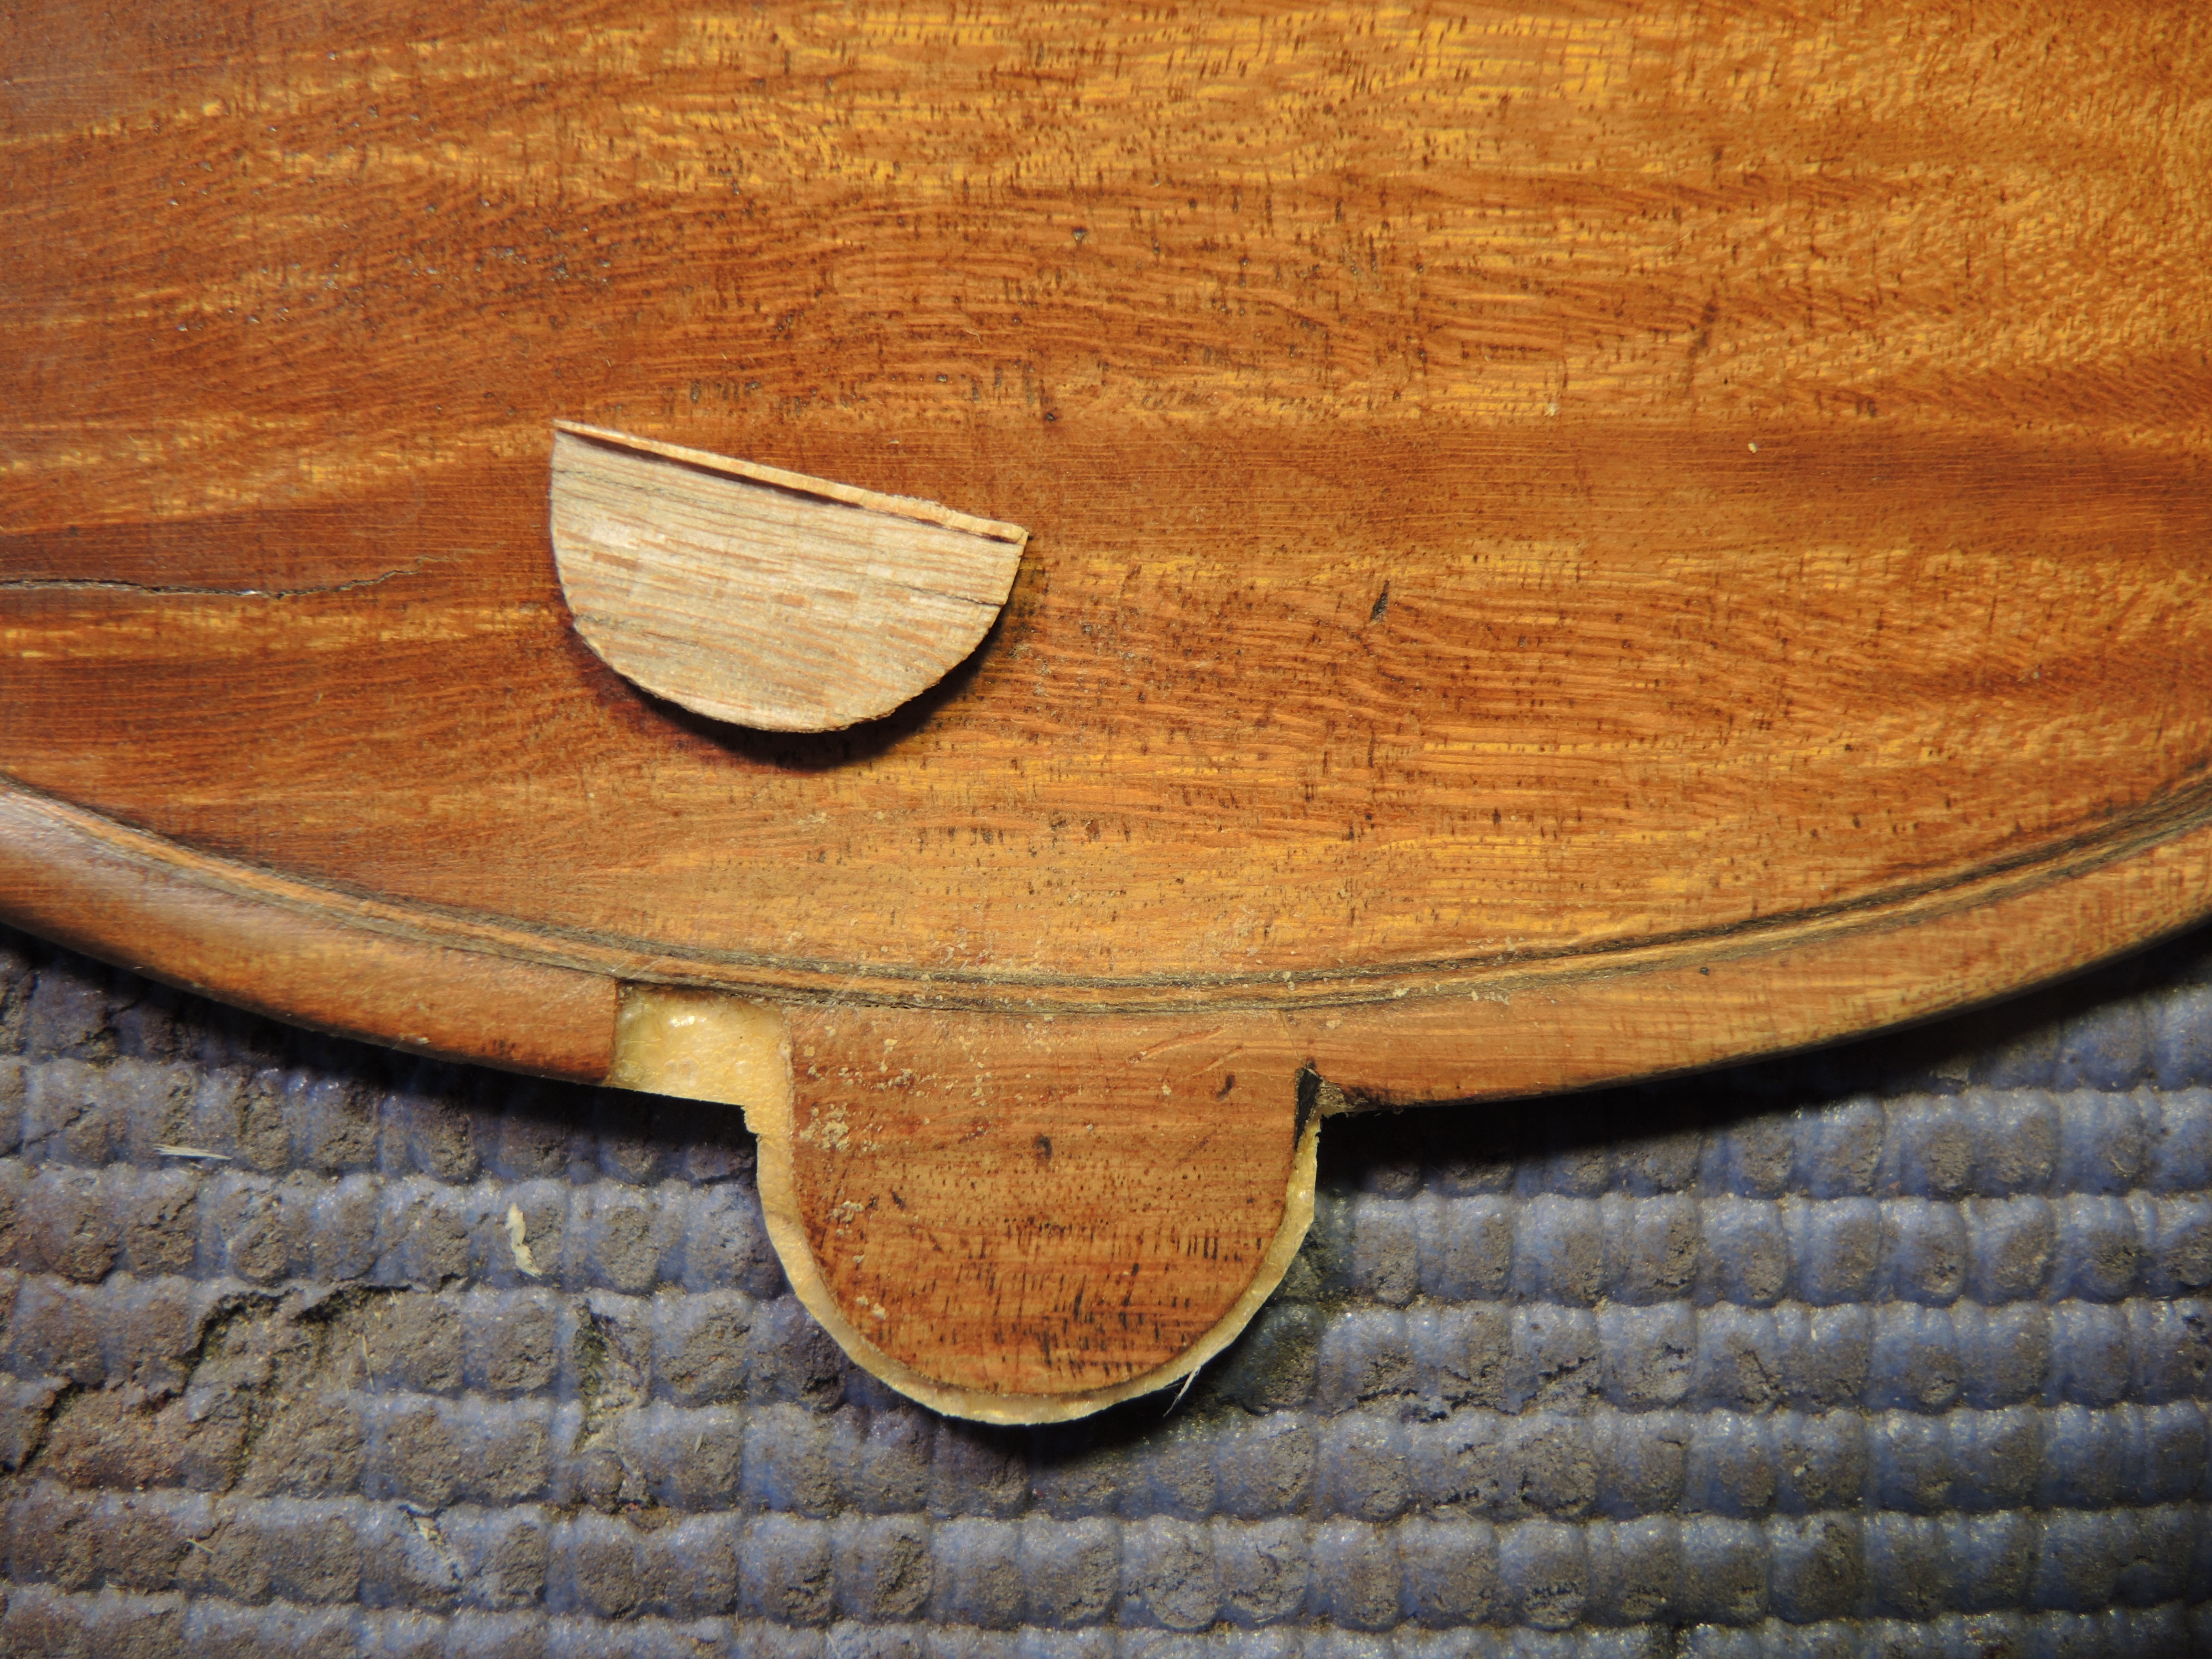
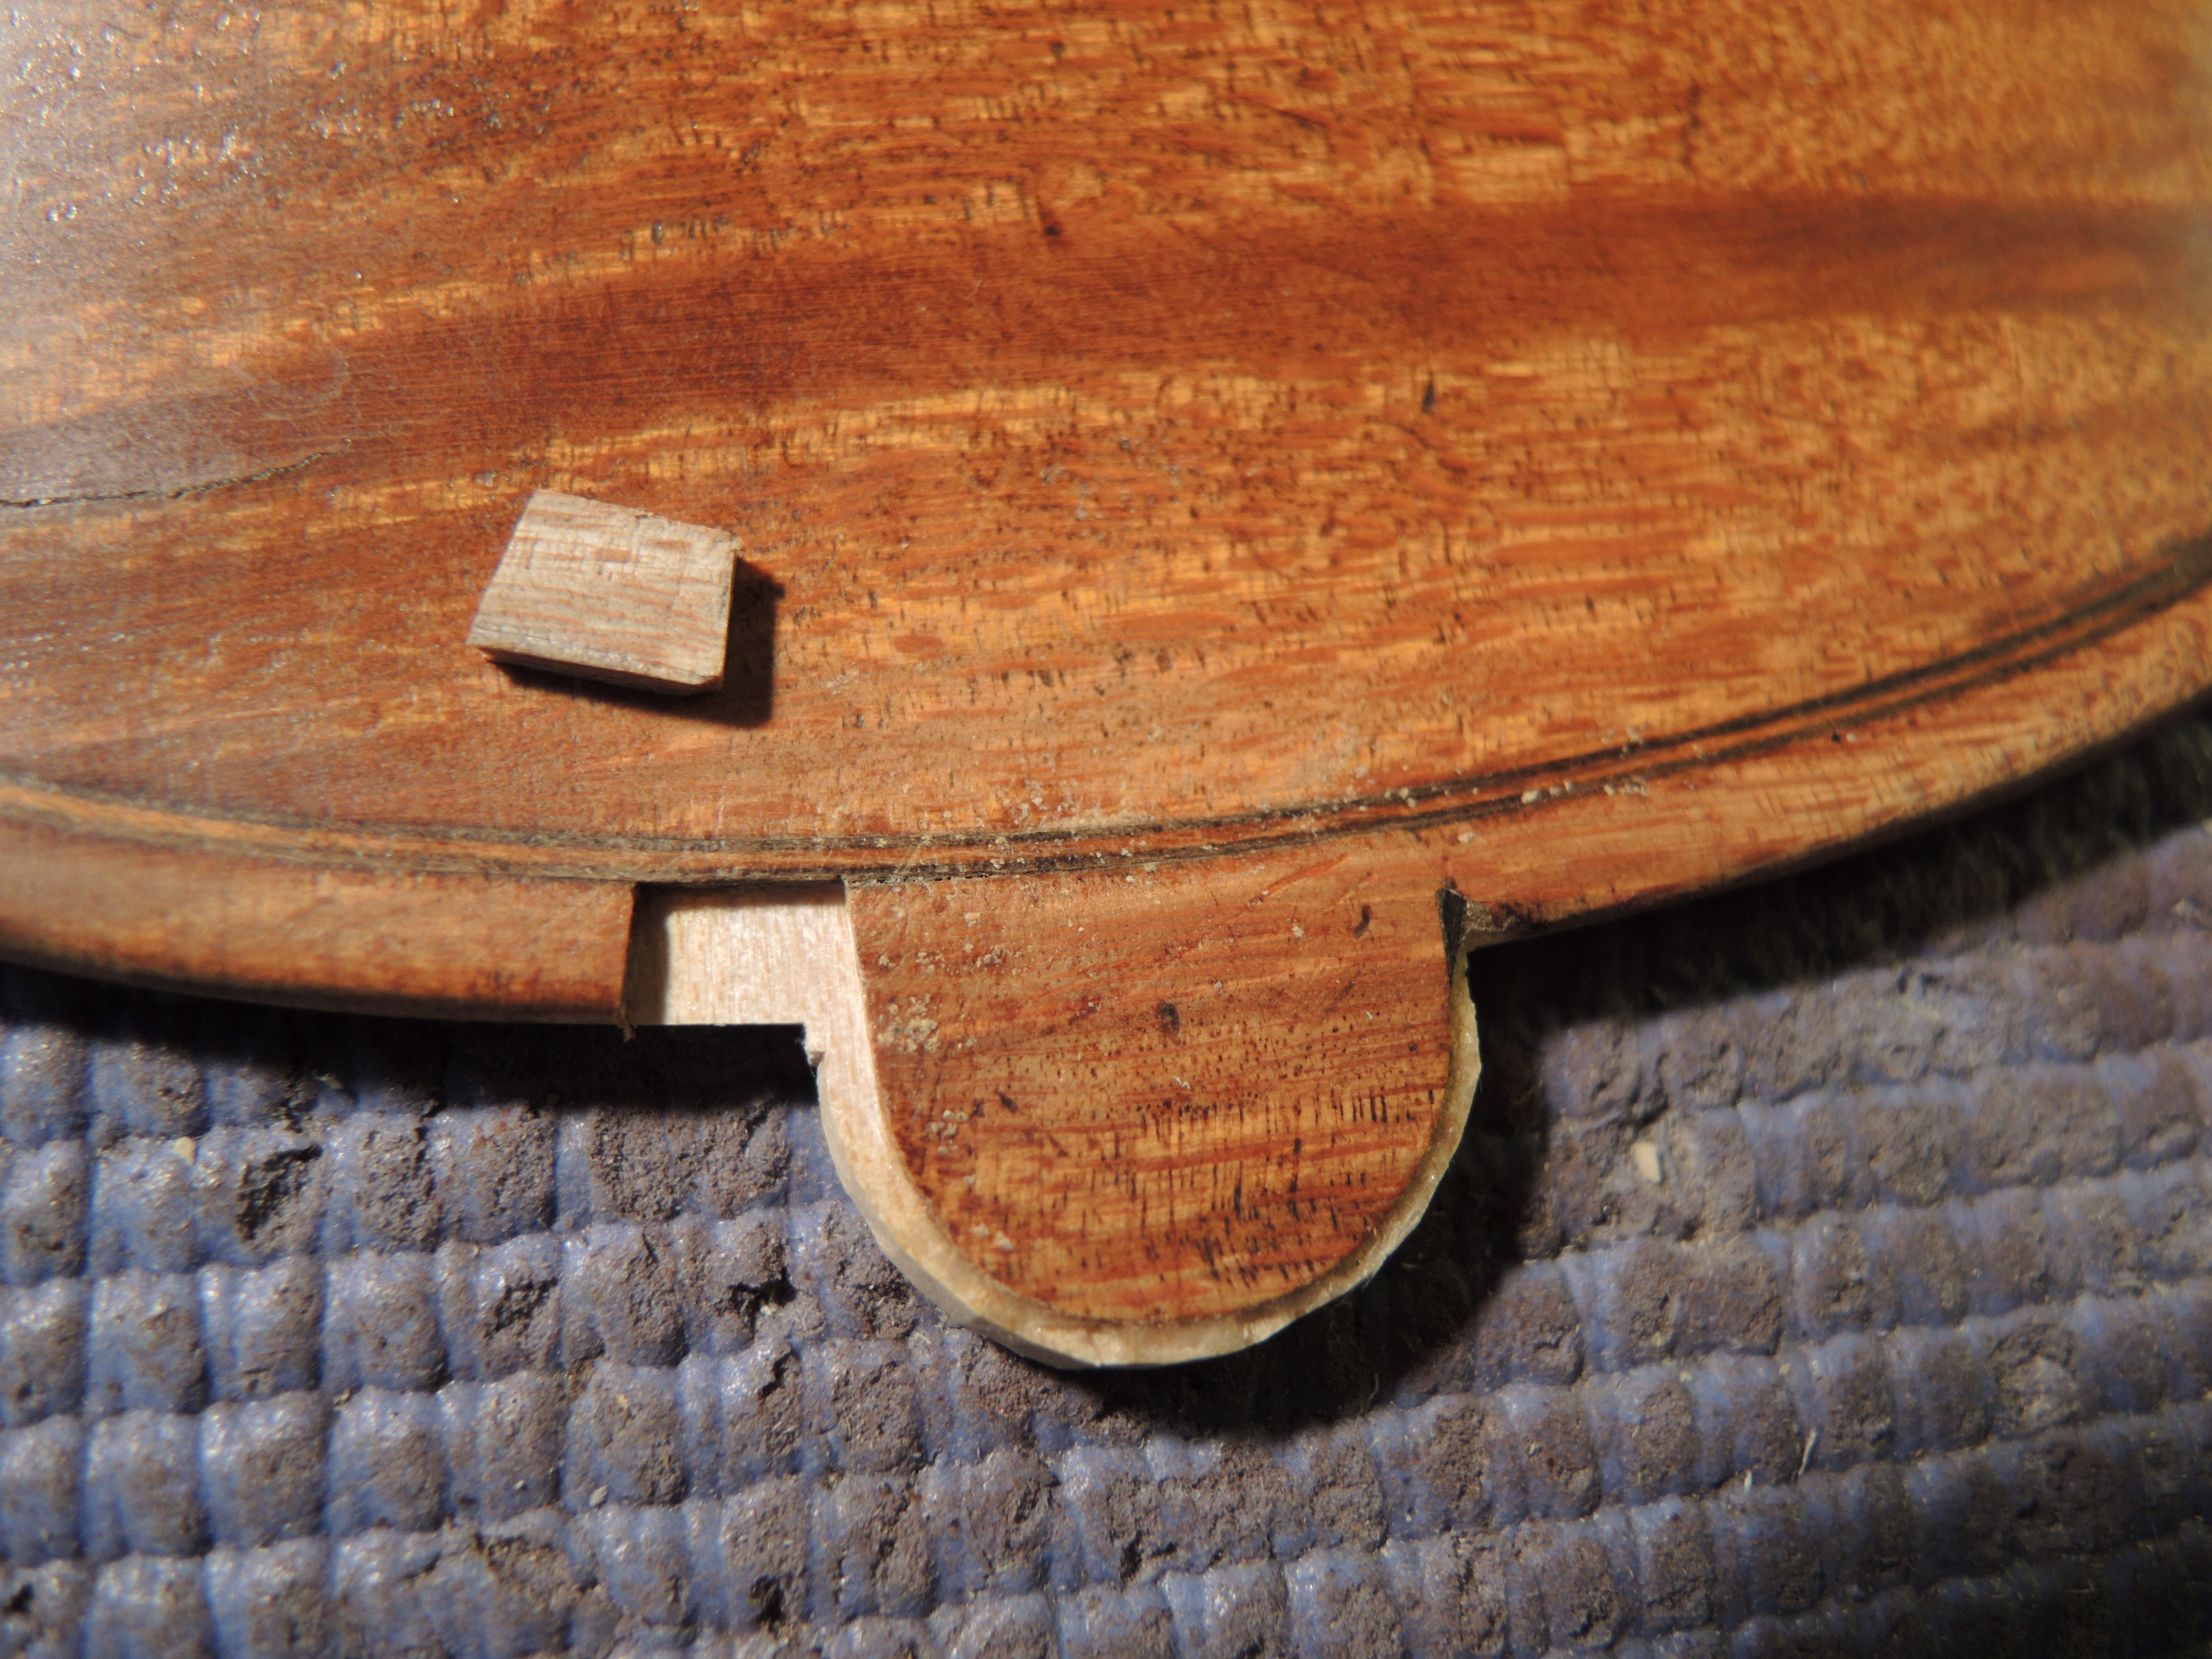
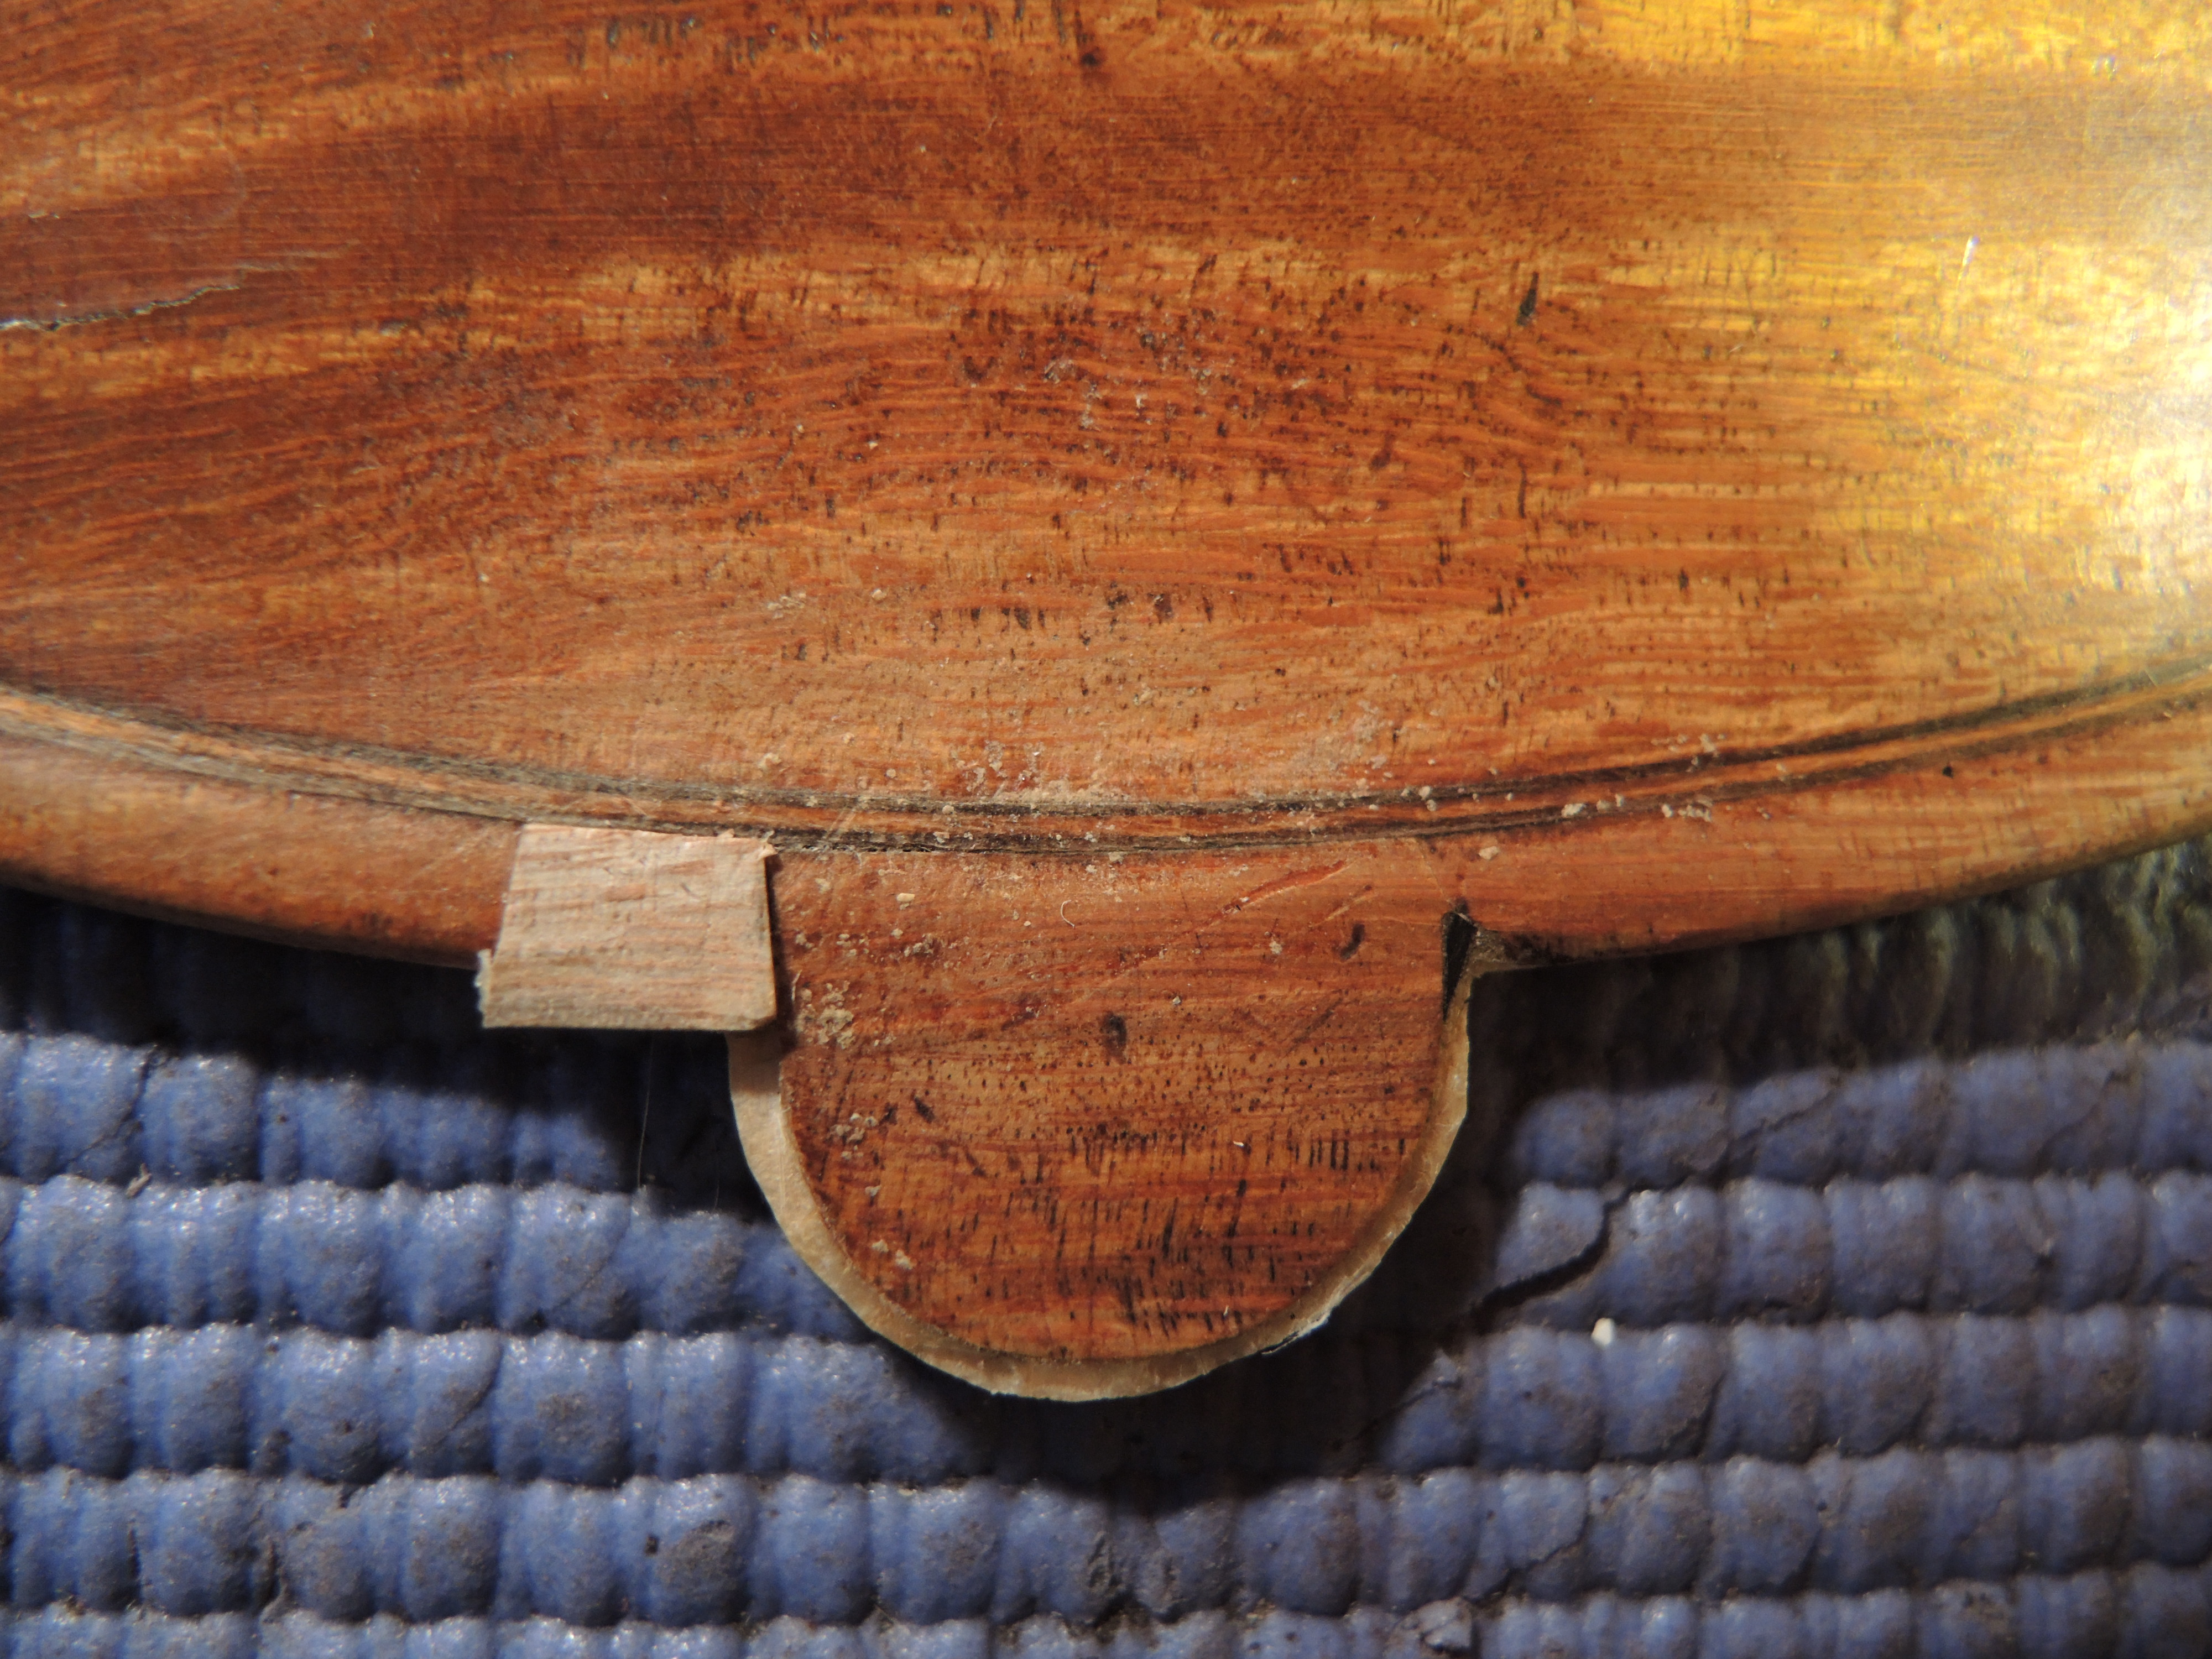
This is how it looks with the fingerboard removed and the neck pushed back into the dovetail mortise. The top of the violin was cut through to accept the first modern neck. We now have a gap that will be filled with matching spruce, to restore the unbroken perimeter of the upper bouts.

IMG_0561

Fitting this piece of spruce happens before the neck is glued. It will be glued in, shaped, and varnished to match after the neck is installed.

IMG_0564

I use a baroque fingerboard made by Helmut Pöser in Germany. The core is spruce while the playing surface and sides are ebony. The fingerboard comes to me oversized so that it can be shaped and fitted appropriately.

IMG_0577

The underside of the board is precisely ramped to create the correct pitch over the body of the instrument. The length that is suspended is shaped in an aesthetic manner, although in the ancient method of construction, this shape had a practical purpose as well. The bump near the base of the neck provided a positive point to insert a wedge which would exert downward pressure as the top was being glued onto the body.

IMG_0614

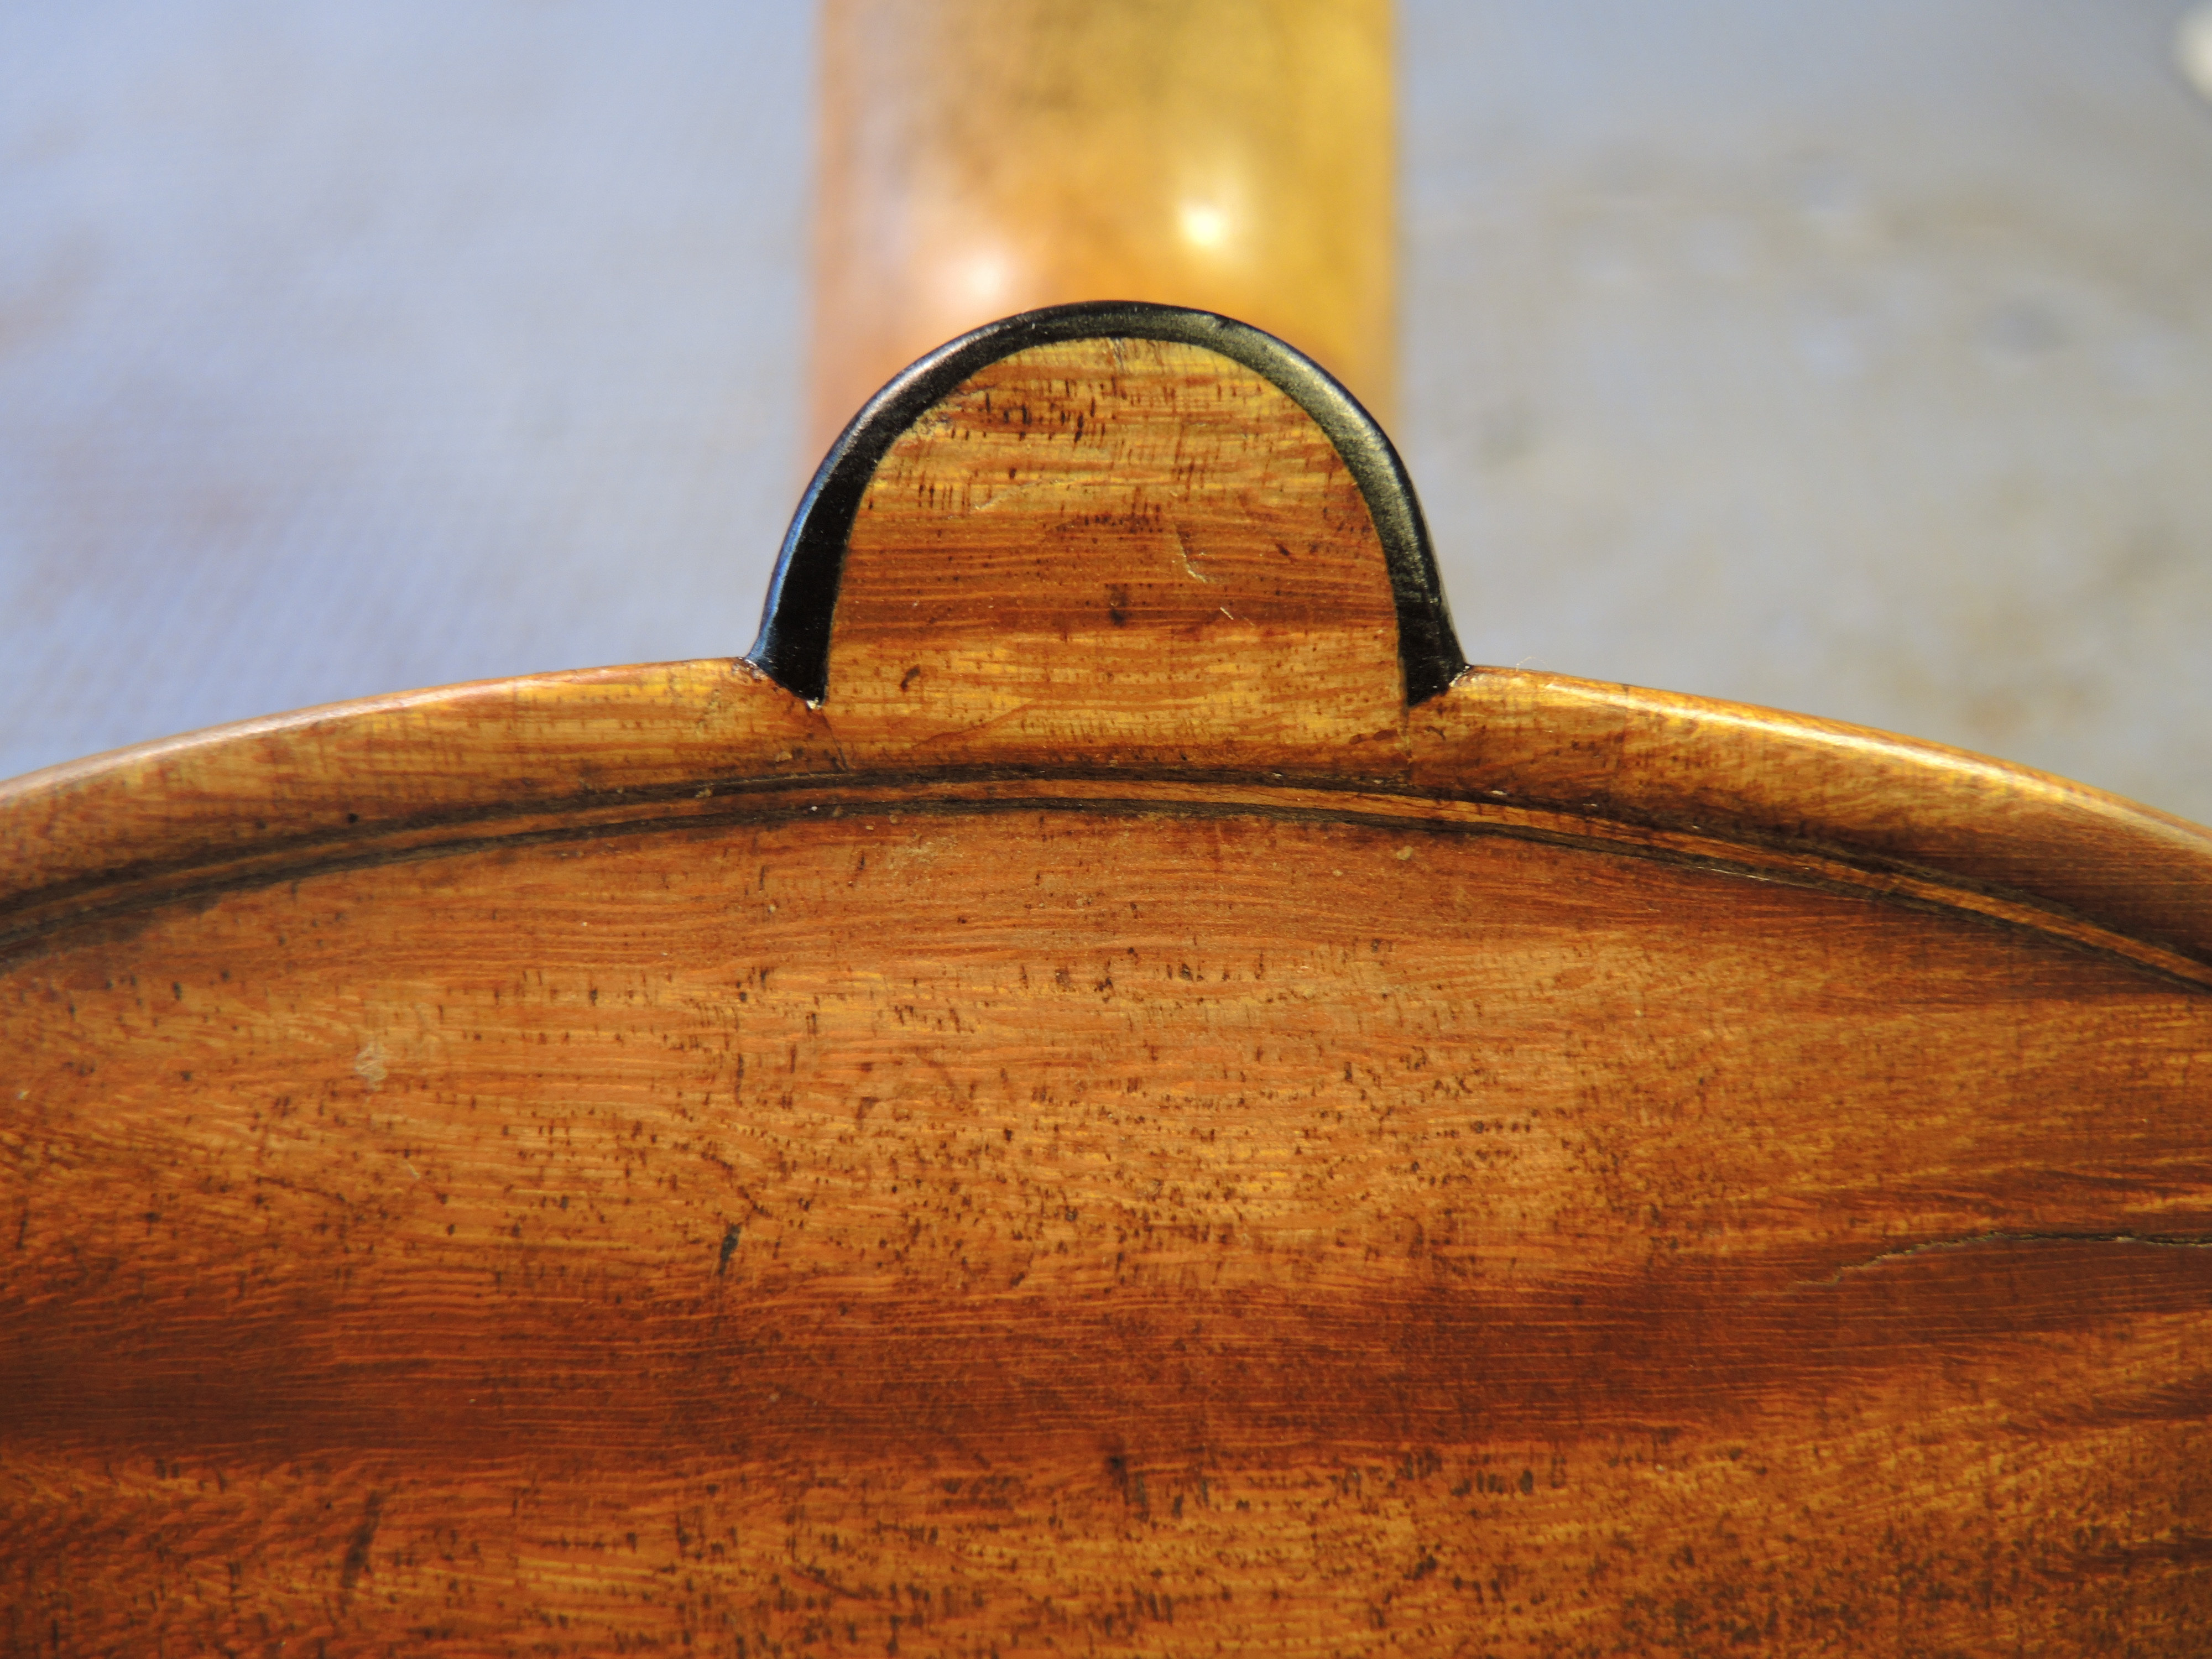
The final neck shaping is done with the fingerboard permanently glued on. All new wood has been varnished to match the original.

IMG_0619

The graft blends well into the old scroll.

IMG_0618

The shape of the neck replicates the dimensions of an original Jacob Stainer violin neck c. 1620.

IMG_0617

The new neck is finished! The violin is set up with new baroque tailpiece, bridge and gut strings.

IMG_0609

Now, back to the future? Or would that be forward into the past?

IMG_0603

Read Full Post »

My life improved dramatically the day Mr. G moved in.

If you are a violin restorer, you probably have all the clamps required to make a violin, plus a plethora of other specialty gadgets for holding and clamping every finished part of an entirely curvaceous instrument. Multiply this by x if you work on cellos, too. If you work on viols, you are probably smart to specialize and outfit accordingly. If you work on basses, there is no hope. Usually the violin clamps work for violas, but the cello clamps are, of course, a lot bigger, generally used less frequently, and that much more of a pain to store.

One truism of violin making/restoring seems to be that there are never enough clamps. At least that’s the way it always feels. My answer to this mental state (besides buying more clamps) is to make sure that the ones I have are accessible. Even that thing that I use maybe once every three years. Even that thing I bought because it looked like a good idea at the time, but I still haven’t used it. If I were to put it REALLY away, I would forget that I have it, and then I would need it. And, having forgotten all about it, I would have to suffer hearing myself whine, yet again, about not having enough clamps.

So when I saw Mr. G in a fancy woodworker’s catalog, I thought: “He ain’t cheap, but he might be worth it”! The big question was: “Are we truly a good fit”? Well, Mr. G has exceeded my expectations, so I think I’ll keep him.

I know it would be hard for the general public to understand what’s at issue here. So here is a sampling of some of the clamps I use  on a regular basis:

Now imagine a pile of these oddly shaped objects jamming up your drawers:

I like neat. And I like being able to pick up one clamp up at a time, without a snaggly bunch of hangers-on coming along for the ride. And that’s why Mr G and I get along so well. Look at this:


And this:

And this:

Wait, I’m not done…this:

And finally, this:

Yeehaaw! That just about takes care of everything. ‘Til death do us part!

Did I mention he comes with wheels and is great at holding a glue pot?

Read Full Post »

Today I had a client in with a violin in need of gluing. While that in itself is nothing notable, there is an aspect of this encounter that may qualify as a teaching moment, especially apropos to those of us in the Northern Hemisphere who are heading into the heating season.

Violin family instruments are put together with hot hide glue, which has unique properties that are particularly advantageous in some circumstances. I’m not a “science guy” so I can’t answer questions about crystalline structure or tensile strength as opposed to other kinds of strength. I do know, for instance, that drywall screws have incredible holding power unless you whack’em sideways with a hammer, and for some reason, I am reminded of this when I think about violins and hide glue.

Hide glue, made from animal byproducts, is essentially the same stuff that’s been used for hundreds of years in the assembly and repair of violin family instruments. The remarkable characteristics of this adhesive include its strength and its weakness. We have a wealth of instruments with top and back center joints that have retained their integrity for hundreds of years. Be thankful. Then we have the treble side upper bout and the lower bass side seams that, on so many instruments seem to open up on a regular basis. Again, be thankful.

Wood moves seasonally, especially here in New England. In moist weather, it swells. In dry weather it shrinks. Plain and simple. In my house here in Holyoke, the oak floors creak in the winter and in the summer, I can’t close the doors on the antique cherry corner cupboard without risking not being able to open them again until October. In my last house, the oak floors in my living room developed summer speed bumps that would have been the envy of any gated community.

An instrument seam glued with hide glue will break apart when stressed. This is a good thing in mid-winter when the heat’s been on and the wood shrinks. It’s preferable to having the wood itself crack. Having open seams glued is a normal part of violin/viola/cello maintenance. This characteristic of hide glue is also the reason that it is even possible to disassemble an instrument to do interior repairs. So we’re thankful, right?

That said, if a violin maker/restorer is smart, and skillful, he or she will take advantage of the properties of the materials at hand, in this case I’m considering the glue. Hot hide glue can be mixed in ways that varies its strength. A fresh pot of glue will be strongest. With repeated heatings, its strength diminishes. The strength can also be altered depending on the proportion of  water used in the batch. Theoretically, one would be very smart to use the strongest glue, say, for the center joints in the top and back, for setting the neck joint, and for joining fresh cracks. It may be smart to use a weaker glue mix for securing the fingerboard, and assembling the top, which could be subject to seasonal stresses. Remember, an open seam is preferable to a crack.

Speaking as a restorer, we like the fact that hide glue is reversible. It may seem counter intuitive, but the reversibility of hide glue actually increases the chance that an instrument will live a very long life.

Back to my client, who was smart to call in an emergency. She was concerned with the lower block area of her violin, which looked like this (violin is viewed with the back up, so we can see the area where the tailpiece is anchored by the end button):

Indeed, the glued seam had released, but in this case, the loose seam extended over the lower block, leaving the body of the instrument vulnerable to the longitudinal string tension. I suspect that the end grain of the lower block was improperly sized on this relatively “new” instrument, before the top was glued on, causing the area to separate.

One can see from the photo how the string tension has compressed the body from end to end, and the button/rib assembly has abandoned the original glue line. The lower block is no longer secured to the top, and the spruce top is now bearing more than its share of structural tension. Not a good scenario, structurally speaking, BUT one that is easily remedied at this stage. When I loosened the string tension, my client and I both heard the lower rib/block area pop back into place.

This story ends with a simple gluing and a happy violinist! The moral of the story is that all open seams are not created equal. This particular seam opening demanded immediate attention due to the structural issues it presented.

Read Full Post »

By the time a restoration project is complete, it’s sometimes hard to remember what it looked like to begin with. I try to take lots of pictures, especially when I expect the transformation to be dramatic. Working with a camera and lighting is an ongoing adventure for me and my success rate is not as consistent as I would like it to be. I do not manipulate my photos with the exception of occasionally adjusting the tint or color saturation so as to come closer to the original.

Violins come in a million subtle shades of…well, brown. Red brown, black brown, yellow brown, orange brown and green brown. That almost covers the spectrum. Blue is probably the least used color in my retouch palette, although it’s occasionally useful to push a reddish brown toward a deeper purpler red brown. I have a 19th century Parisian instrument that may go in that direction.

Here are some sets of sequential photos that show a recent project undergoing extensive retouching of the varnish. If the color of the instrument  seems inconsistent from photo to photo, it’s because the photographer is inconsistent! If there happens to be a digital photographer out there with a busted fiddle, I’d consider trading for some lessons!

I repaired a bad break near the left f hole. The lower right corner has been rebuilt and there was extensive wear and tear to consider. Click on the thumbnails to enlarge.

Here is the finished front:

Here’s a close-up of that f hole break before, during, and after:

Here’s an area of the back:

Finished, the back looks like this:

This is a rather dramatic example of varnish retouching as part of a larger restoration project. Retouching on a small scale is also part of a regular maintenance plan. We use our instruments, and as a result, they suffer some wear, and the occasional hit. Retouching is a way to assure that they age gracefully!

Read Full Post »

I was planning to make pickles today, but since my source at the farmer’s market forgot about the request I submitted last week for a pile of cukes and fresh dill, my plan changed around 10 am this morning. I will NOT buy pickling cukes from Stop and Shop. I’ll wait for the next local market. If I’m really smart, I will make a note in my gardening notebook, which I never write in, and make sure that next year, I grow cukes. HOW could I be growing tomatoes, eggplants, greens, beans, peppers, kale, cabbages, brussels sprouts, tomatillos and NO cukes? Frankly, sometime last spring, after digging the second, or was it the third new bed in a relatively uncultivated property – vaguely, I remember flopping in the garden bench and thinking : “That’s it. Screw it!”

Now I’m sorry about the cukes, even though the pass on zucchinis was rather calculated. This time of year, in these parts, it’s almost impossible not to have a run in with a delicious, cheap zucchini that somebody else grew.

So instead of making pickles, which I will hopefully do next weekend, I engaged my tried and true decision making process, which is to seriously ask myself – what’s making me craziest, right now? It was the disarray of jars and varnishes, strewn about my back porch.

Three or four months ago I made fresh retouch varnishes. My own materials were low, but I was also preparing to teach a workshop, and so made up some fresh stuff to share with students. So today I finally  got around to finishing the project, which meant straining and dispensing the remainder in appropriately sized receptacles with labels and everything. The yield: about four times as much as I need. (Thank God I didn’t plant zucchinis).

This stuff is gold. I have about a three year supply, with plenty extra to share or use as leverage. The thing is, successful varnish retouch is largely about knowing your materials, so this is good. A relatively new facebook friend, and member of my community joked “Why 3 years? Is something happening in 2012 I should know about?” Not to worry. This is violin speak. Quintessentially slow art. I have wood in my attic that I bought years ago and may not use for years to come. If I’m smart, I’ll scribble “DO NOT BURN” just in case it outlives me.

Read Full Post »

While not technically a sign of life, it is a small milestone on the way to looking and feeling like a healthy violin.

Here’s our poor little fiddle again. If there is a technical term for this part of the scroll, I don’t know it. It doesn’t have a structural role so much, but it is the terminus of a divinely inspired design. I have heard it called, among other things, the monkey butt. How droll.

Whatever it’s called, in this condition it was a poke in the eye every time you picked this fiddle up.

So here’s what I did about it:

The most crucial part of this operation was finding just the right piece of wood – something that would match the original in color and grain orientation. If ever there were a repair I would like to “disappear”, this would be it. The damaged area is excavated, removing as little of the original as possible, to create a viable gluing surface. The new wood, actually a piece of very old wood, is oriented properly, fitted exactly and glued. It is then carved down in the manner of the original, and varnish applied to match.

Halfway there… and now:

Voilà! How’d I do?

Read Full Post »

There’s an interesting thing that happens in the course of a restoration. Today it happened subtly, but in a moment. I recognized it as I shifted my tool and repositioned the violin top that I was working on. zzzzzzt! There it was, a sign of life.

I’ve been working on a lovely old violin that has suffered not only the effects of a couple hundred years, but also some serious misfortune at the hands of unskilled violin “repair” hacks. It was a sickening mess or a titillating challenge, you pick.

An instrument with multiple cracks, broken and deteriorated edges, loose bits of wood and a bad history with a glue pot, doesn’t vibrate. It buzzes, rattles, clacks and gasps or simply lies dead on the workbench. With a change of fortune it could become, yet again, a beautiful, healthy, vibrant and participating member of the performing arts scene. That’s my job.

zzzzzt! It’s not a sound, it’s a feel. Gradually, as the cracks are glued properly, and the loose bits are reinforced or replaced, my patient remembers that it was MADE to vibrate. In my hands, it feels like a nicely tightened drum head. Ready. Excitable. Alive.

More on this fiddle another time – stay tuned!

Read Full Post »

Older Posts »

%d bloggers like this: